Showing posts with label Automation. Show all posts

Sunday, April 12, 2009

MOTD: Auto-update the date

I've talked before about making Word templates out of commonly used documents. I've also talked about date fields and SaveDate fields. Some documents might use language like "Executed this 15th day of March, 2009." There isn't a good way to have the day read "2nd", "3rd", "4th" ect. Now most people might think this isn't a big deal, its easily changed manually. But the whole point of my template is to cut down on ugly typos when I forget to update something. So, I created a macro.

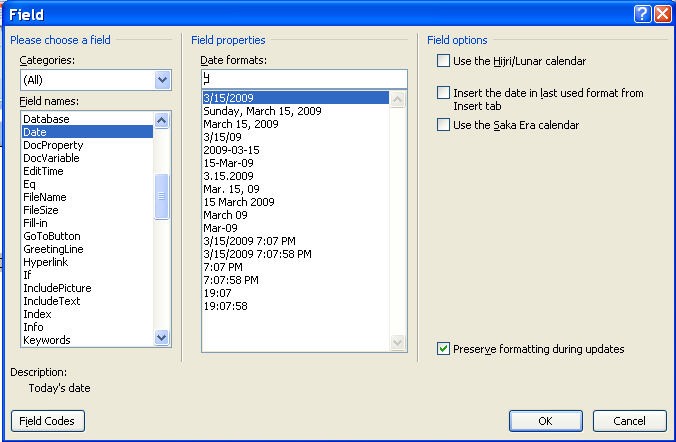
In my template, I inserted a date field by going to Word's Insert tab and clicking Quick Parts and then selecting Date from the Field names list (you can use SaveDate if you want - see this post for more about the SaveDate field). The Date field displays the current date. The Date formats box is used to control how the date is displayed. The box uses a code system; "d" stands for day, "M" stands for month, "y" stands for year, "h" stands for hour, "m" stands for minute, and "s" stands for second. Note that you capitalize M for month because lower case m stands for minute. The formating is a little difficult to explain so examples are the only way to go. If you want the date to be formatted like "3/15/09", type M/d/yy. For "3/15/2009," type M/d/yyyy. For "Sunday, March 15, 2009," type dddd, MMMM dd, yyyy. Most of the common formats are in the list so you don't generally need to figure the formatting out. However, I want to do something out of the ordinary. I want the document to read something like "Executed on the 1st," so clear out the Date formats box and just place a "d" there.

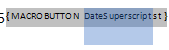
Right after the Date box we just inserted, insert a MacroField by selecting MacroField from the Field names list. In the Display text box put something like "st" (because this box will say "st", "nd", or "rd"). In the Macro name box just leave the default there (AcceptAllChangesInDoc) because we will add our own Macro next. Your document looks something like this:

Click on the "st" and type Shift + F9. This will expand the MacroField to display its code. Replace AcceptAllChangesInDoc with DateSuperScript - the name of the macro we will make next.

I want the month and the year at the end so I insert a second Date field using the code MMMM, yyyy.



The finished product looks like this:

Now type Alt + F11 to open up the Visual Basic editor. Then select the Project template for your document in the project window (it will have the name of your Word document). Expand the project. Expand the Microsoft Word Objects tab and select the ThisDocument icon and then paste this code in the document:

Sub AutoSuperScript()
Dim oStory As Range
Dim oField As Field
For Each oStory In ActiveDocument.StoryRanges
For Each oField In oStory.Fields

If InStr(1, oField.Code.Text, " MACROBUTTON DateSuperscript") Then
oField.Code.Text = " MACROBUTTON DateSuperscript " + GetDateSuperscript
End If
oField.Update
Next oField
Next oStory
End Sub

Private Sub Document_New()
AutoSuperScript
End Sub

Private Function GetDateSuperscript()
'1-> st
'2->nd
'3->rd
'0, >3 ->th
strDt = Str(Day(Now))
strEnd = Right(strDt, 1)
If strEnd = 1 Then
GetDateSuperscript = "st"
ElseIf strEnd = 2 Then
GetDateSuperscript = "nd"
ElseIf strEnd = 3 Then
GetDateSuperscript = "rd"
Else
GetDateSuperscript = "th"
End If
End Function


Now every time you create a new document from your template the date will be updated. If you really want to get wild, add the AutoSuperScript function to the UpdateAll function I talked about in this post. That way, the superscript will get updated every save.

Sunday, April 5, 2009

MOTD: Print Current Page Shortcut

I use the print current page setting in the Print dialog of Word enough that I recorded a macro for it. I simply recorded a macro without editing any code so you can record it yourself using this post and this post, or you can put the following code in the Normal template and assign a shortcut to it (use this post):

Sub PrintCurrent()
'
' PrintCurrent Macro
' Macro recorded 3/9/2009 by Michael Shubeck
'
Application.PrintOut FileName:="", Range:=wdPrintCurrentPage, Item:= _
wdPrintDocumentContent, Copies:=1, Pages:="", PageType:=wdPrintAllPages, _
ManualDuplexPrint:=False, Collate:=True, Background:=True, PrintToFile:= _
False, PrintZoomColumn:=0, PrintZoomRow:=0, PrintZoomPaperWidth:=0, _
PrintZoomPaperHeight:=0
End Sub

Sunday, March 29, 2009

MOTD: Insert Merge Field

I've posted before about the amazing potential of Word's Mail Merge feature, I use it so much that I've created a macro to insert MergeFields when I'm creating a merge document. I then assign the macro to a shortcut so I can quickly insert these fields in my documents. I simply recorded a macro without editing any code so you can record it yourself using this post and this post, or you can put the following code in the Normal template and assign a shortcut to it (use this post):

Sub InsertMergeField() 'ALT CTRL M
'
' InsertMergeField Macro
' Macro recorded 3/13/2009 by Michael Shubeck
'
Selection.Fields.Add Range:=Selection.Range, Type:=wdFieldEmpty, Text:= _
"MERGEFIELD INSERT ", PreserveFormatting:=True
Selection.MoveLeft Unit:=wdCharacter, Count:=1
Selection.Fields.ToggleShowCodes
End Sub

Sunday, March 22, 2009

Macro of the Day (MOTD): Keybord Shortcut For Envelope Printing

I do a lot of envelope printing in my job and I use Word's Envelope Wizard to do most of my envelope printing. I don't know why they have a whole wizard for this though. I would prefer if I could simply highlight the person's address in the letter I was drafting, type a shortcut, and have it print. So, I created a macro. Type Alt + F11 to open the Visual Basic editor. I would put this code in the Normal template. The Normal template is the basis for all Word documents. By putting code there, it will run in any document you are using.

In the Project window on the left side of the Visual Basic editor, open up the Normal tab and the Microsoft Word Objects tab under that. Double click on the ThisDocument icon. Paste the following code in.

Sub PrintEnvelope()
'
' PrintEnvelope Macro
' Macro recorded 3/10/2009 by Michael Shubeck
'
ActiveDocument.Envelope.PrintOut ExtractAddress:=False, OmitReturnAddress _
:=True, PrintBarCode:=False, PrintFIMA:=False, Height:=InchesToPoints( _
4.13), Width:=InchesToPoints(9.5), Address:=Selection.Text, AutoText _
:="ToolsCreateLabels3", ReturnAddress:= _
"The Law Offices of Gregory A. Yates", ReturnAutoText:= _
"ToolsCreateLabels2", AddressFromLeft:=wdAutoPosition, AddressFromTop:= _
wdAutoPosition, ReturnAddressFromLeft:=wdAutoPosition, _
ReturnAddressFromTop:=wdAutoPosition, DefaultOrientation:=wdLeftLandscape _
, DefaultFaceUp:=False, PrintEPostage:=False
End Sub

Now lets hook the macro up to a keyboard shortcut. In Word 2007, click on the Office Button Then click on Word Options at the bottom of the menu that pops out. Then hit the Customize tab. Finally, at the bottom of the Customize window, hit the customize keyboard shortcuts button. In the Categories box, scroll down to Macros. Then, in the Macros box, select our PrintEnvelope macro. Now, click in the Press New Shortcut Key box. Type the key combination that you want to assign to the macro. If the key combination is already used it, the window will show text that says "Currently assigned to." Usually I just replace what was assigned by the Microsoft people because they have shortcuts for features I will never use. Finally, hit the Assign button (don't forget this - I do all the time).
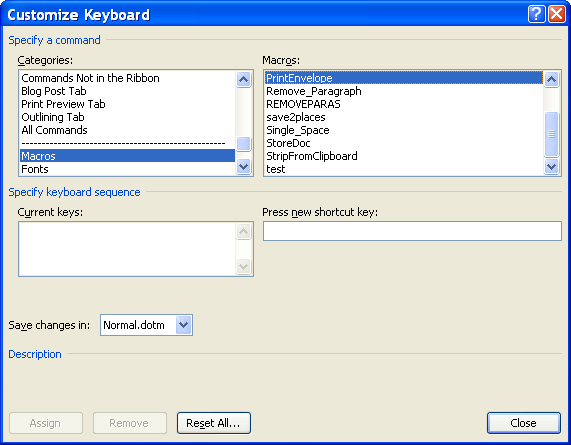
Now you can highlight a person's address in your document, use your shortcut, and the envelope will print.

As a final note, watch out where the envelpe prints if you have multiple printers installed. The envelope will print to the printer listed in the print menu.

Sunday, March 15, 2009

MOTD: Autoupdate fields on save

This will be the first of a series of posts on cool Microsoft Word macros I have been using to make me more efficient at producing documents and cut down on embarrassing errors. Bill and I have been preaching the benefits of macros for a while on this blog. Check this post out for an introduction.

I use templates for all of my commonly used documents, from my basic letter or fax template to more complex pleading documents. I have discussed how to create templates before. Word allows you to insert blanks called fields in a document. These fields will automatically fill in information at certain times. In many of my templates I have fields that automatically fill in the date or generate tables of contents, among other things. These fields all need to be manually updated by right clicking on them and clicking update. Sometimes I forget to update the field before printing so I created a macro to automatically update the fields when I hit the save button. Credit goes to these blog posts: 1, 2.

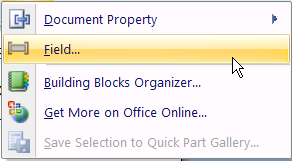
For experimentation, create a template using the procedures from the creating templates tutorial. Then insert a save date field in that template. In Office 2007, you go to the Insert tab on the Ribbon bar . Next, go to the Quick Parts button . Then select the Field menu item.


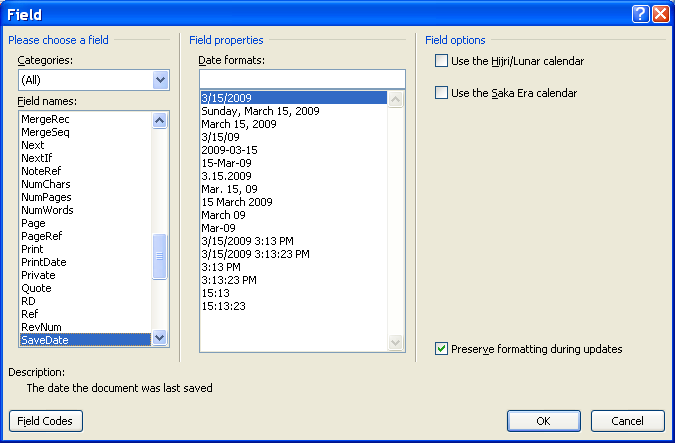
In the Field dialog, select
SaveDate. Select whatever date format you desire.


A SaveDate field displays the date the document was saved (after it is updated) and, thus, is handy for letters and other documents that are printed and sent on the date they are saved.

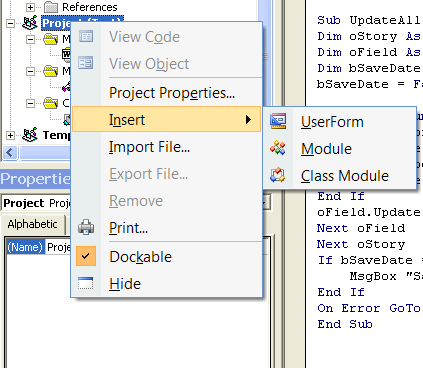
Now lets bring up the Visual Basic editor so we can start adding some code, type Alt + F11. In the Project window on the left, find the letter project and right click on it. Next click insert -> module.

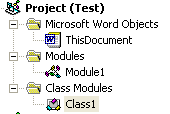
A new item called a code module will be inserted under your project in a modules folder. It will be named Module1.

Now insert a new class module just like you inserted the code module. The class module will be named Class1.

Your Project window should look like this:


The specifics of what ThisDocument, Module1, and Class1 are not very important at this point so I wont go into detail. We will just paste code to make things work. If you have a desire to understand code, see here.

Double click on the ThisDocument icon in the Project window. Now paste the following code into the code window:

Private Sub Document_New() 'has to be Document_New not Document_Open for it to work in a template

    Call Register_Event_Handler

End Sub

Now double click on the Module1 icon and paste this code in:

Dim X As New Class1
Public Sub Register_Event_Handler()
    Set X.App = Word.Application
End Sub

Finally, paste this code into Class1:

Public WithEvents App As Word.Application

Private Sub App_DocumentBeforeSave(ByVal Doc As Document, SaveAsUI As Boolean, Cancel As Boolean)

UpdateAll

End Sub

Sub UpdateAll()
Dim oStory As Range
Dim oField As Field
Dim bSaveDate As Boolean
bSaveDate = False

On Error Resume Next
For Each oStory In ActiveDocument.StoryRanges
For Each oField In oStory.Fields
If oField.Type = wdFieldSaveDate Then
    bSaveDate = True
End If
oField.Update
Next oField
Next oStory
If bSaveDate = True Then
    MsgBox "Save a second time to update a save date field"
End If
On Error GoTo 0
End Sub

SaveDate fields present a special paradox. The document has to be saved before the field can be updated. I have the following code to remind me to press save twice to update the field:
If bSaveDate = True Then
    MsgBox "Save a second time to update a save date field"
End If


Now save the template and double click on the template file to create a new document using that template. When you hit save the message box will remind you to save a second time, and when you do, the date field will be updated automatically.

This same code will automatically update tables of contents, numbering and any other Word field that automatically generates information.

Saturday, February 14, 2009

Autogenerate Table of Contents in Word

So its that time again and the poor first years are writing briefs in Appellate Advocacy. One of the most frustrating things was creating a table of contents and table of authorities and have all the pages right - especially forgetting to update after an edit.

Auto Generate Table of Authorities
West provides a utility called WestCiteLink that takes the pain out of the table of authorities. There is a Firefox plugin called CiteGenie that is supposed to take the pain out of citation. Bill recommended CiteGenie but I haven't had the time to test it.

Auto Generate Table of Contents
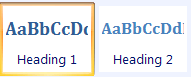
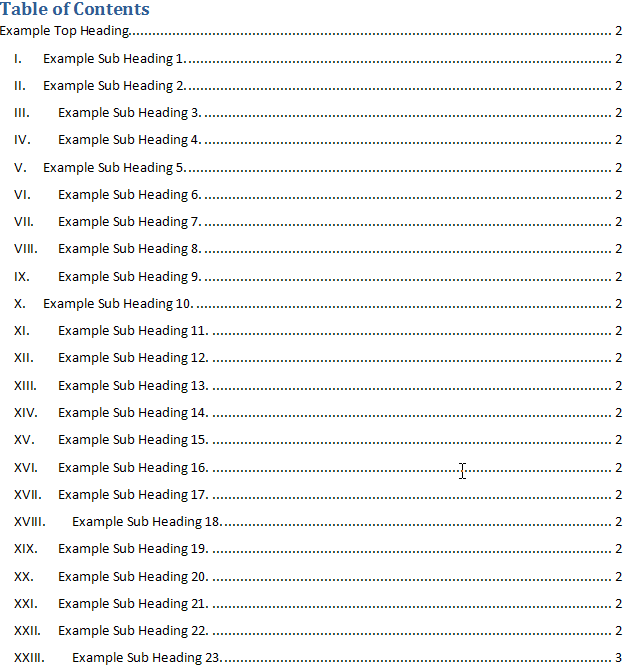
Word has a function that will generate your table of contents automatically. To use it we first have to become familiar with styles. In Word 07, you can find the styles buttons under the Home heading (because the first thing I think of when I think "Home" is styles and fonts etc. - good job M$). In earlier versions of Word, styles can be found under Format->Styles and Formatting (now that makes sense). We are going to be using the heading styles that look like this:


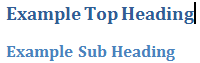
Type some text into a blank word document, highlight the text, and then click on the style you want to apply. As a result, your text looks like the style you selected:


I have created two headings, one with the Heading 1 style, and the other with the Heading 2 style. Word will put all my headings that have been set to a certain style into a table of contents, complete with page numbers.

First click at the place in the document where you want your table of contents. Go to the References tab in Word 07 (go to Insert->Reference->Index and Tables in earlier versions of Word). Then click on Table of Contents:

Then select one of the Automatic tables. Your table of contents is automatically generated.

Customizing Your Styles
Its probably not a good idea to have your brief headings the funky colors, sizes, and fonts that Word defaults to so we will want to customize the heading style.

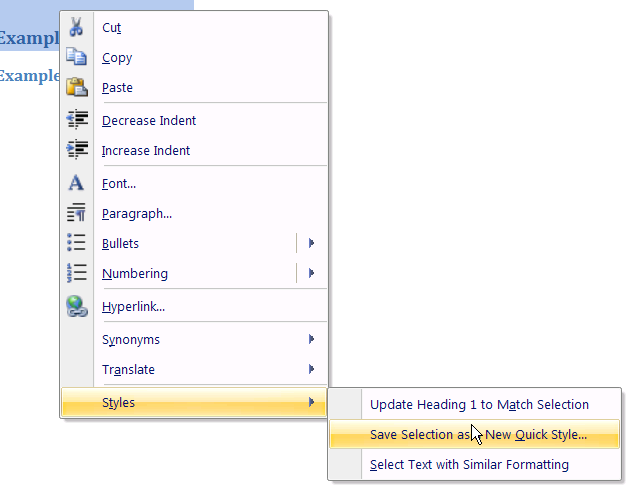
In Word 07, highlight your heading, right click on it, and select Styles->Save Selection as New Quick Style (in earlier versions, right click in the styles menu and select modify):

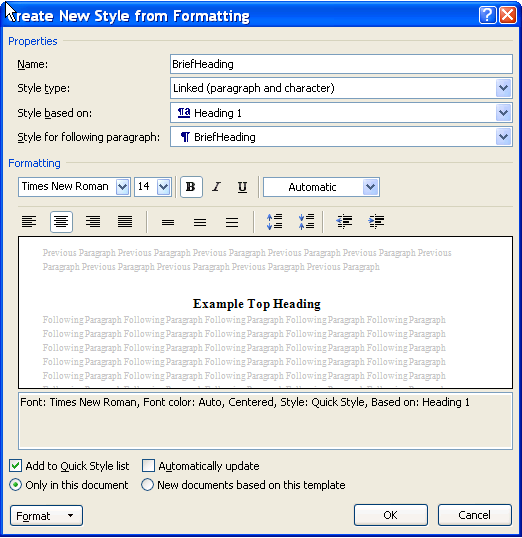
Under name, type a name for your style. Then click Modify. The modify window will pop up and you can set the font, size, and color settings the way you want them.


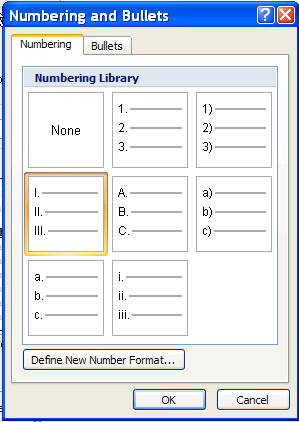
For numbered headings, click the Format button and select Numbering. In the Numbering window, pick the numbering type you want.


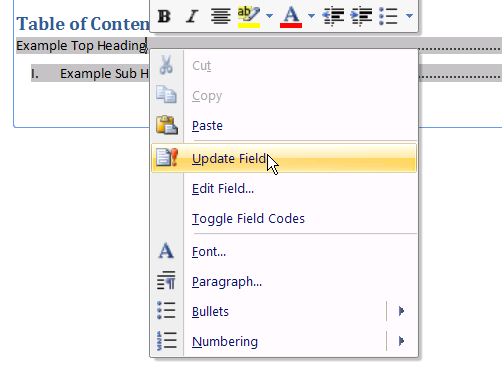
When all is finished, you can simply add more headings and then right click on your table of contents and hit update table.


Then select Entire Table (don't just update page numbers). Your table will automatically add the new headings and the right page numbers.


Wednesday, October 1, 2008

Law Office Automation - Mail Merge in Word

Bill and I have been preaching automation for a while now. I'm going to talk about one of the very most powerful technologies known to law office automation - Mail Merge. Mail Merge is a very unfortunate name and I'm not sure Microsoft really understands the power of what they have created. Think "fill in the blanks" instead. To use Mail Merge you first create a document with blanks in it. Then you set up a database with the information that you are going to use. Finally you use Mail Merge to suck that information in.

I'm going to use an example of a summons because that's the area of law I'm working in. I've experimented with a similar setup for corporate organization/offering documents at a previous employer. You are only limited by your imagination.

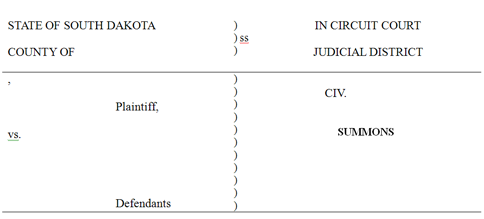
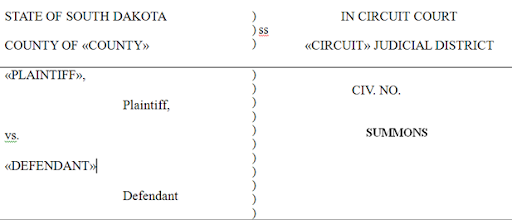
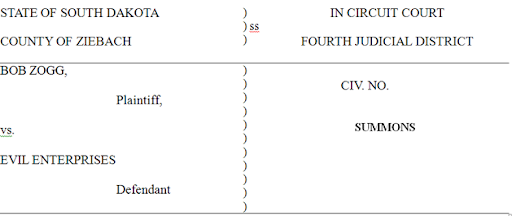
First, we need to set up our document. We can leave out our "blanks." Word gives us a special "blank" to use. Below is my caption.

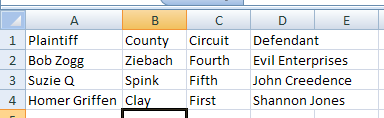
In this caption I left out the things that change from case to case. Here, the county, circuit, plaintiff, and defendant. Next, we can create our "database." In Excel, add headings for those items that change (remember what these headings are for later). Under the headings, we can fill in the information that will be "sucked in." Now save the Excel table (remember where you did).

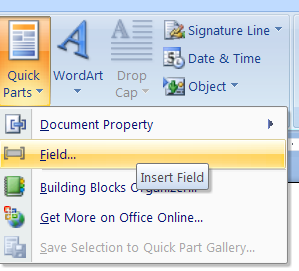
The next step is to add the "blanks." First, click where you want your "blank" to go. In Word 2007 (the worst version of Word EVER) the our "blanks" are cleverly hidden under a button under the Insert tab called Quick Parts. Under that button, select Field.

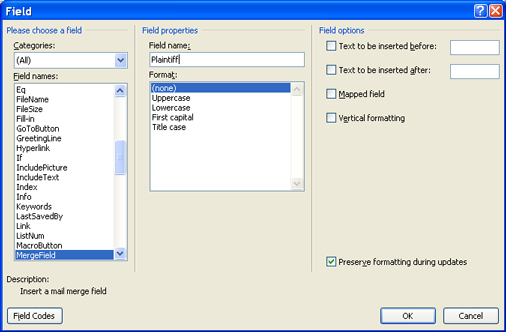
The Field dialog box will open. This is where we will find our "blank," aka field. Specifically, our field is called a MergeField. Select MergeField from the Field names list. Next, under the Field properties heading, add a Field name. The field name is what connects your Word document to your Excel table. YOUR FIELD NAME HAS TO MATCH A HEADING NAME IN THE EXCEL TABLE. For example, the first field I am inserting is the Plaintiff field. In my Excel table, I named this heading "Plaintiff" (obviously). So my Field name in Word should also be Plaintiff (its not that hard right?).

After you hit ok, your Field should appear in your document. Field names will be surrounded by greater-than, less-than characters to show that there is a field there. I.e. «Plaintiff» (my Windows charactermap tells me this symbol is really a "Double angle quotation mark"). Below you can see my finished product. Now to set up the Merge.

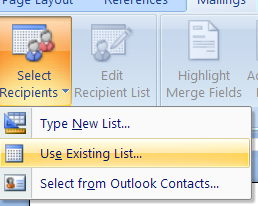
First we have to point Word at our data source, the Excel table we made earlier. This step is where we really see that Microsoft doesn't have a clue of what kind of technology they have created. All our Merge stuff is buried under the Mailings tab in Word 2007 (I guess you can mail a summons). To pick a data source, we have to go to the Select Recipients button (what???). Then pick Use Existing List.

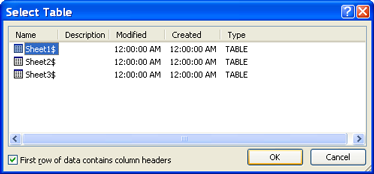
First navigate to where you saved your Excel file (hope you remembered). Then we select which table in the Excel file we want to use (Excel can have multiple Worksheets in a file). Our table is Sheet1 (unless you named it something).

Now our Word Template should be talking to our Excel Data Source. We can test things out. Hit the Preview Results button.

Our first record is automagically filled in.

You can cycle through the records in your Excel table with the forward and back buttons.

Finally, we can have Word spit all the records into new documents. Hit the Finish & Merge button. Then click Edit Individual Documents.

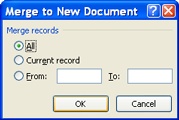
The Merge dialog will let you pick which records to Merge.

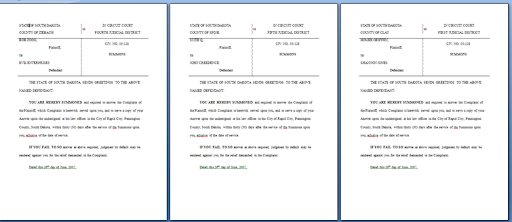
The finished product:

Now imagine how efficient this can make litigation.

EDIT: I've had an issue in Word 2003 that I want to share. Save your merge template before you associate your Excel file and don't save you template after associating the file. It seems that Word will open the Excel file in memory and, if you save your template with the Excel file associated, Word takes a snapshot of the Excel file or simply keeps it open in memory. When you try to add information to the Excel file and then do a new merge in Word, the new information isn't included. Or, wose yet, when you try to open your template that has been saved with an Excel file associated, sometimes it gives you an error indicating that the Excel file is already open. Finally, if you save your template when you are in the "Preview" mode, your MergeField will be overwritten. The moral of the story is that you (1) should get your template built how you want it, (2) save, and (3) never save when an Excel file has been associated/opened in the Word template.

Thursday, September 4, 2008

Macro-Enabled Template: Step 2 - Preparing The Form

This is step two in the series showing you how to create macro-enabled templates (METs). Click here for step one, preparing the document. For the finished product see the freebie file in this previous post.

Open up the document that you prepared in step one.  At this point we need to open up the Microsoft Visual Basic editor.  The easiest way to do this is by pressing ALT+F11 while having the template open in Word.  In the Project Pane on the left hand side find the name of your document, mine is template.pleading.  Right click on the name of your document, drag down to insert, then select UserForm.


If the blank form does not pop up expand the form folder and double click UserForm1 to display the blank form.

Now take a look at the Toolbox (if it isn't displayed click View>Toolbox).  There are several tools here that we will not need to use.  For now we're only going to focus on two, and later a third.

First Select the "Label" tool () and we'll begin creating our input boxes.  You can use whatever order is the most natural and user friendly to you for the input boxes. I prefer to place the boxes in roughly the order they appear in the document and also try to keep information that will be standardized in several other documents (County, Circuit, etc...) near the top as well. Click, with the label tool selected, in the upper left hand corner.  Now with the label created, look to the Properties pane on the left hand side (if it's not present hit F4).  The only two values we're going to be concerned about are "Name" and "Caption".  Change both to the appropriate label title (No spaces allowed in the "Name" field).

Now select the "TextBox" tool (). Click just to the right of the label and edit the "Name" field in the Properties pane to something appropriate (ex. CountyName, PFirstName, etc...).

Continue these two steps until you've created and labeled a Text Box for each bookmark you created earlier. Note however, that if you're using the same value for multiple bookmarks you only need to create one text box.  This is the whole point of using these METs, type information one time and it's replicated throughout the document as appropriate.

The final step in preparing the form is to insert the Command Buttons.  Click the command buttons icon () and place three buttons at the bottom of the form.  Edit the "Name" and the "Caption" to create a Submit/OK button, a Reset/Clear button and a Cancel button.

This concludes the preparation of the form.  The next step is to Code the Form, and as many of you may guess, it's the trickiest part of creating the METs.

Tuesday, August 19, 2008

Macro-Enabled Template: Step 1 - Preparing The Document

This is step one in the series showing you how to create macro-enabled templates.  For the finished product see the freebie file in this previous post.

First we need to open the file that we want to make a template of.  For this preview I've chosen just a simple blank caption. Use one of your own in making this template.  Notice in the image below that there are no blank spaces where information will be filled in, for example instead of a blank space we have COUNTYNAME, you will find shortly that this is for an important reason.


Next we are going to change a setting in office to display bookmarks.  Unless you're already a Word power user you've likely not run into a whole lot of bookmarks, nor does the average person, thus the reason they are hidden by default.

 In Office 2007 click on the Office Button, then click Word Options at the bottom of the pop up.  Next click on the Advanced tab (reading this blog qualifies you as an advanced user, pat yourself on the back),  scroll down about one-third of the way until you see the 'show document content' heading. Click OK.
In Office 2003 click Tools>Options>View and check the bookmarks box. 

Now we go through the process of inserting bookmarks.  The template will replace the bookmark contents with the values we enter into the form, so we need to insert a bookmark anyplace the information will be changed.  A couple of things to know about bookmarks before we hit it. First, bookmarks names cannot have spaces. Next, multiple bookmarks cannot have the same name, so we'll use numbers at the end of each bookmark to avoid duplicity. 

So lets go to it then.  Start by highlighting COUNTYNAME, or your variation of it and click Insert>Bookmark.  Name the bookmark countyname1.  I prefer to use all lowercase for my bookmark names, it's not a requirement though.  Continue this process for each field: circuitnumber, pfirstname, plastname, dfirstname, dlastname, casecode, casenumber, documenttitle, and any other you may have.  Be sure to not use spaces and to add sequential numbers to the end for each bookmark name.  In the template I used I didn't have any bookmarks duplicated on page one and so all those ended with 1.

Once you're finished with that... guess what.  You're document is prepared, mostly.  One final tip that I want you to do is highlight everything that you want to keep highlighted and hit CTRL+SHIFT+A.  This will force the text that we enter in the form to be all caps even if we don't type it as such.

So that's step one of this guide broken down into nice digestible parts.  I'll post the next entry on Monday.

Friday, August 15, 2008

FREEBIE: Macro-enabled template

Rest assured. We're both still alive. Decompressing after the bar exam turned into a couple of week ordeal for me as I had to quickly drive west river for a funeral, and then, since the Olympics started I've been a pretty hardcore Phelps Phan. Now my wife has told me in no uncertain terms that if she has to watch one more preliminary heat she'll... well, I'll save you from the gory details.

So with nothing more holding me back it's time to tackle the holy grail of word processing efficiency, macro enabled templates. Click on the image below to download a FREE template that we'll create using the upcoming guide. Feel free to use this as you wish (works with Microsoft Office only, when opening the file you'll have to select "allow macros".)


And for all you teach-me-to-fish types out there. The guide will start on Tuesday.

Wednesday, March 5, 2008

Intro To Simple Code

I've debated a little about whether to publish this post. Hopefully your practice will be so busy you wont have time to look at code (or can pay someone to do it). On the other hand, it might pay to at least understand some concepts in order to benefit from the power of automation. Bill and I need to set the stage for some simple (trust us) code that will make your life easier (really - trust us). This post is only for the most daring so if you don't like it - just don't read it.

Programs

A program is made up of a collection of commands for the computer. Think of it as a script in a play, the computer simply follows the script. For example a program that draws a circle on the screen might say:


1. Get access the screen to draw on
2. Grab a red pen
3. Draw a circle with the pen
4. Quit

Functions

We might want our program to draw many red circles all over the screen. In that case, it may be simpler to combine steps 2 and 3 into what is called a function. With a function we can say:
function DrawRedCircle = 1) Grab a red pen then 2) draw a circle with the pen at a certain location. We put the steps inside the function.
Now our program might work like this:


1. get access to the screen
2. DrawRedCircle (at the top right of the screen)
3. DrawRedCircle (at the bottom left)
4. DrawRedCircle (middle)
5. Quit

Variables

Now lets say we want to write a function that averages several numbers together. Our program needs to 1) add all the numbers together and 2) divide them. Our function might look like this:


function average(numbers 50, 60,95,85)
...
SumOfTheNumbers=50+60+95+85
AverageOfTheNumbers=SumOfTheNumbers/4
...

What the expression "SumOfTheNumbers=" did is put the result of the addition away in a memory location somewhere. SumOfTheNumbers (and AverageOfTheNumbers) is called a variable. A variable is kind of like a pocket that you can put stuff in and use it later. In this case SumOfTheNumbers is storing the sum of the numbers, 290. AverageOfTheNumbers holds the average, 72.5.

Function Parameters

Sometimes a function needs to take certain inputs and do some work on them, these inputs are passed into variables called parameters. For example, our Average function could take our numbers as parameters. For example our function would look like this.


function AverageFourNumbers(FirstNumber, SecondNumber, ThirdNumber, FourthNumber)
{
SumOfTheNumbers=FirstNumberSecondNumber+ThirdNumber+FourthNumber
AverageOfTheNumbers=SumOfTheNumbers/4
}

As you can see, the function adds together the four parameters FirstNumber, SecondNumber, ThirdNumber, FourthNumber and then averages. To use our new function we code:


AverageFourNumbers(50, 60,95,85)

Function Returns

We may want our functions to spit out a value so that our program can either store it or do more processing on it. An output from a function is called a return value. For example, our average function would be far more useful if it returned an average so that we could write that to a file or something. A function that returns the average might look something like this:


function AverageFourNumbers(FirstNumber, SecondNumber, ThirdNumber, FourthNumber)
{
SumOfTheNumbers=FirstNumberSecondNumber+ThirdNumber+FourthNumber
AverageOfTheNumbers=SumOfTheNumbers/4
return AverageOfTheNumbers
}


To use this we can write:


MyGPA=AverageFourNumbers(50, 60,95,85)

Lets pretend we wrote a function that would store a GPA to a file. We'd probably want it to take the GPA and a file to save it in as parameters. Calling the function might look something like this:


StoreGPA(MyGPA, MyFile)

Objects

An object is a way to wrap related variables and functions into one package. A good example of "relatedness" is a program that models a bouncing ball. In that case, we need a number of variables to describe the ball. A bouncing ball also has a number of actions that it performs, these actions are stored in functions. When talking about objects programmers use a little different terminology. Variables that are inside the object are called properties. Functions that are inside the object are called methods.

Lets "describe" a ball object:


Ball
{
Properties=
Color
Size
BounceSpeed
Type
etc.
Methods=
DoBounce
Stop
}

We can set the properties of our ball something like:


Ball.Color = red
Ball.size =15
Ball.BounceSpeed =2

We can make the ball bounce by calling the DoBounce method (assuming we/others have done the programming for the method):


Ball.DoBounce

Repitition and Evaluation

A program repeats a process by doing what is called a loop. With loops you can tell to computer to repeat a group of commands for a certain number of times or until a condition occurs.
An example of looping 100 times:


For Number=1 to 100
...do some stuff
Next Number

An example of looping until a condition occurs:


Number=1
Do Until Number=100
Number=Number+1
...do some stuff
Loop

Both of the examples did the same thing but one used what is known as a For Loop which does an operation a set number of times. The other example used a conditional loop that stops when a condition occurs .Both types are useful in different situations.

Evaluation is accomplished with an if statement. An if statement allows you to test if a condition has occurred. For example:


if Number=100 then
DisplayMessage("Number is one hundred")
end if

The above example uses an if statement to test whether the variable Number is 100. If it is then the pretend DisplayMessage function is called.

Strings and Numbers

A computer stores to general types of information, words and numbers. Collections of words are called strings. Numbers can come in several types integers,floats and doubles for example. An integer is a whole number (no decimals) and can be positive or negative. A float can be a decimal. Strings are enclosed in quotations. For example:


MyString = "This is an example of a string"


Numbers don't need quotations. For example:


MyNumber = 1


Putting it all together


To tie this all together, lets look at the macro we recorded in this post. The code strips all the returns so that pastes from Acrobat files aren't all messed up. It looks like this:


Sub Macro1()
'
' Macro1 Macro
'
'
Selection.Find.ClearFormatting
Selection.Find.Replacement.ClearFormatting
With Selection.Find
.Text = "^p"
.Replacement.Text = " "
.Forward = True
.Wrap = wdFindContinue
.Format = False
.MatchCase = False
.MatchWholeWord = False
.MatchWildcards = False
.MatchSoundsLike = False
.MatchAllWordForms = False
End With
Selection.Find.Execute Replace:=wdReplaceAll
End Sub

This function is in a language called Visual Basic (VB). VB is the language that the Microsoft Office applications use for their automation. Office allows you to do tons of cool stuff to save time with VB.

The code shows a function called Macro1. VB makes a distinction between functions that return a value (see the returns section above) and functions that do not. Functions that return a value are simply called a "function." Functions that do not return a value are (confusingly) called a "sub procedure." Hence, the "sub Macro1" and "end sub" in the code above.

After the function name line you see three lines that start with a single quote ('). In VB a single quote is the beginning of a comment. Anything after a single quote is not run by the computer, its not considered code. Comments allow you to "show your work" like in algebra. Basically, you can write notes about what each line is supposed to do etc. The 3 lines of comments above just give the name of the function.

Next we see that the function does alot with some "Selection" thing. Selection is an object (see the discussion of objects above). Inside the Selection object there are various properties and methods. The Macro1 function sets and runs those properties an methods to get the result we want. The first two lines of code are:


Selection.Find.ClearFormatting
Selection.Find.Replacement.ClearFormatting

Remember placing a period after an object name is the way to access properties and methods within the object (its kind of like a door to the inside of the object). In this case, the function accesses the Find property. Actually Find is itself an object. The Selection object has a Find object inside. To get even more wild, the Find object has a Replacement object inside of it. ClearFormatting is a method. So whats going on? Well the Find and Replace objects represent the Find what and Replace with fields on the Find and Replace box (at right). Word allows you to find words or phrases with specific formatting, like bold/italic/etc. The ClearFormatting function does the equivalent of clearing that setting out on the Find and Replace box for both the Find what (our function's Find object) and the Replace with (our function's Replacement object).

The next line of code says:
With Selection.Find

A "With" block is just a shortcut so that we don't have to type the object name over and over. It simply means that all the properties and methods used following the "With" will belong to the Find object (Selection.Find).

The code that follows isn't all that important to understand specifically. It just sets up our find by setting the properties of the find object. These properties will be used when we do the search to determine how the search will be done. Four properties are important though.
.Text = "^p"
.Replacement.Text = " "
.Forward = True
.Wrap = wdFindContinue


The Text property is what we are searching for. Here, the paragraph character (^p). The Text property of the Replacement object is what we will replace the paragraph character with. Here, a space. Forward tells the search to look forward and wrap tells it to wrap the search around when it gets to the end of the document.

The last line of the function calls the Find object's Execute method with a parameter telling it to replace all occurances of the string we are looking for (^p).

__________
Share This Post!