


When I got my Android phone earlier this year I immediately started searching for dictation apps. I was disappointed in what was out there. It was obvious that most of the options were meant to capture "remember to pick up eggs, milk, and baby food"-ish voice notes rather than "this is a letter to John Smith regarding ...."-esque dictations. Many of the options had no pause button, which is essential, and many had no ability to scroll back and re-record, which is essential. Almost all of the free options had crippling 30-second to 1-minute time limitations. Finally, most of the apps, free or paid, recorded in formats which were not easily opened by my paralegal using any standard software.
TapeMachine Recorder solved every one of those problems. It allows you to pause, it allows you to scroll back and review or record over. It records in the standard .wav format but can convert to more compact, but equally standard, formats such as .mp3 or .ogg for emailing (which is all easily done from within the TapeMachine app). There is no real time-limit to the recordings (except what your memory space will allow). There is a free lite version as well. This version has a 1-minute recording limit and cannot covert files to .mp3. The Full version is just over $5.00 and is well worth it.
My Android phone now doubles as a fully functional digital dictation recorder that converts the recording and emails it to my assistant for typing. Go buy it.
Tuesday, September 6, 2011
Android Dictation with TapeMachine
Tuesday, August 24, 2010
Kill Double Spaces
It's 2010. You're reading this on a computer. You don't write on a typewriter. Likewise, you probably don't write in a fixed-width font (like Courier). If you do use a typewriter-esque, fixed-width font: STOP IT! They're ugly, archaic and less readable than variable-width fonts. If you use variable width fonts there is no reason, other than habit, to use two spaces after a period. This is actually a fairly controversial issue. A controversy which I have no interest in addressing.
I know what you're thinking. I was taught to use two spaces after each sentence too. It's a difficult habit to break. This macro will help.
Sub Kill_Multiple_Spaces()

'

' Kill_Multiple_Spaces Macro

'

'

    Selection.Find.ClearFormatting

    Selection.Find.Replacement.ClearFormatting

    With Selection.Find

        .Text = " {2,}"

        .Replacement.Text = " "

        .Forward = True

        .Wrap = wdFindContinue

        .Format = False

        .MatchCase = False

        .MatchWholeWord = False

        .MatchAllWordForms = False

        .MatchSoundsLike = False

        .MatchWildcards = True

    End With

    Selection.Find.Execute Replace:=wdReplaceAll

End Sub
Sunday, August 8, 2010
Image PDF to JPG
You can extract images from the PDF format using ImageMagick which is excellent for many other image tasks as well (which I may discuss later). The Windows installer can be downloaded here. The down side is that you have to use the old DOS command line (that old black window).
After installing, you can convert PDFs to JPGs by opening the Command window by going to start->run and typing in "cmd" in the open box. Use the CD command (change directory) to open the folder where your image PDFs are. Then, type "mogrify - format jpg *.PDF". All the PDFs in the directory will be converted to JPGs.

Wednesday, May 26, 2010
Westlaw is Broken...
... for Firefox users at least.
The Volokh Conspiracy confirms that I'm not going crazy. Though their article only specifically identifies the issue on Windows XP the comments report similar problems across various operating systems, and even in Google Chrome. Westlaw is - supposedly - "on it."
Edit: The issue has, apparently, been fixed.
Friday, April 23, 2010
Outlook Email to Task Macro
For several months I have been using ClearContext to categorize and sort my Outlook inbox. One of the features that I liked most about CC is it's abilities to easily create appointments or tasks from an email. However, once the 90 day free trial of ClearContext Pro expires, these utilities are disabled.
Many people probably use the Follow Up flag on the email and call it a day. In fact, I was completely happy with this until just recently. The shortfall with using "follow up" is that it does not create a "task". Both "follow ups" and "tasks" appear in your to-do list in Outlook, and both "follow ups" and "tasks" appear in your tasks pane in Outlook. So, if you don't ever want to do anything but view your tasks in Outlook, you're fine using the follow up flag. However, if you (like me) want to be able to export your outlook tasks in an effort to do something awesome with them, your "follow ups" will be left behind when exporting tasks. (Yes, hopefully that link is a tease to a future post).
I set out to make a macro that:
- Made a task out of the currently selected email; and
- Used the categories I'd assigned to that email using rules to fill in data for the new task for sorting purposes.
Public Sub CreateTaskFromItem()

'This version by Bill Blewett (billblewett.com)
'Modified from KC Lemson's script (http://blogs.technet.com/kclemson/archive/2004/01/31/65586.aspx)
'Which was modified from Jim Durant's script (http://blogs.msdn.com/johnrdurant/archive/2004/01/30/65039.aspx)

  Dim olTask As Outlook.TaskItem
  'Using object rather than MailItem, so that it
  'can handle posts, meeting requests, etc as well
  Dim olItem As Object
  Dim olExp As Outlook.Explorer
  Dim fldCurrent As Outlook.MAPIFolder
  Dim olApp As Outlook.Application

  Set olApp = Outlook.CreateObject("Outlook.Application")
  Set olTask = olApp.CreateItem(olTaskItem)
  Set olExp = olApp.ActiveExplorer
  Set fldCurrent = olExp.CurrentFolder

  Dim cntSelection As Integer
  cntSelection = olExp.Selection.Count

  For I = 1 To cntSelection
    Set olItem = olExp.Selection.Item(I)

    'add email as an attachment to the new task
    olTask.Attachments.Add olItem

    'set subject of the new task
'    olTask.Subject = "Follow up on " & olItem.Subject
'    I moved this down lower to make the new name ONLY the category that's left over not both original categories

    'copy body of email into body of the new task // added by me.  I prefer the body text plus the attachment.
    olTask.Body = olItem.Body


' =~`~= BEGIN PERSONAL CATEGORY RELATED MODS =~`~=

    '==STEP ONE==
    'Copy ALL the categories from the Item (e-mail) to the new Task... Simple.

    olTask.Categories = olItem.Categories

    '==STEP TWO==
    'Give the new task the proper overall value using BillingInformation field

        If InStr(1, olItem.Categories, "Mark", vbTextCompare) <> 0 Then
            olTask.BillingInformation = "Mark"
        End If
        If InStr(1, olItem.Categories, "Clint", vbTextCompare) <> 0 Then
            olTask.BillingInformation = "Clint"
        End If
        If InStr(1, olItem.Categories, "[2.Clint]", vbTextCompare) <> 0 Then
            olTask.BillingInformation = "Clint"
        End If
        If InStr(1, olItem.Categories, "Me", vbTextCompare) <> 0 Then
            olTask.BillingInformation = "Me"
        End If

    '==STEP THREE==
    'Strip the task of ONLY the specific categories which were used above to create BillingInformation values.

    olTask.Categories = Replace(olTask.Categories, "Mark", "", , vbTextCompare)
    olTask.Categories = Replace(olTask.Categories, "Clint", "", , vbTextCompare)
    olTask.Categories = Replace(olTask.Categories, "Me", "", , vbTextCompare)
    olTask.Categories = Replace(olTask.Categories, "[2 ]", "", , vbTextCompare)
    olTask.Categories = Replace(olTask.Categories, "[2. ]", "", , vbTextCompare)
    olTask.Categories = Replace(olTask.Categories, "[2]", "", , vbTextCompare)


' =~`~= END PERSONAL CATEGORY RELATED MODS =~`~=


    olTask.Subject = olTask.Categories & " - Follow Up, " & olItem.Subject 'moved from above to include the proper category

' Misc Cleanups for task names and categories

    'to clean up the new task's subject use:
    'olTask.Subject = Replace(olTask.Subject, "Text to be replaced", "Text to replace it with", , vbTextCompare)
    '
    'to clean up the new task's categories use:
    'olTask.Categories = Replace(olTask.Categories, "Text to be replaced", "Text to replace it with", , vbTextCompare)

    olTask.Subject = Replace(olTask.Subject, "[1.", "", , vbTextCompare)
    olTask.Subject = Replace(olTask.Subject, "]", "", , vbTextCompare)
    olTask.Subject = Replace(olTask.Subject, "[6 ", "", , vbTextCompare)

Next

  'Make the new task display - delete or comment it out (') to not show
  olTask.Display

  'Set the due date for today
  olTask.DueDate = Date

  'No Reminder, but if it was True it would remind in 3 hours
  'the original author of this script had the reminder as True
  'and used the 3 hour mark to make sure that she had all of the
  'settings correct... it's super annoying to me.
  olTask.ReminderSet = False
  olTask.ReminderTime = DateAdd("h", 3, Now)

  'Saving the new task automatically
  olTask.Save

End Sub
The first third of the macro is creating a new task, pasting the text of the email into the task and also attaching the email to the task.
The second third of the macro is my custom categorizing. If an email has a category of "Me" "Mark" or "Clint" then that value is given to the "BillingInformation" field of the task. The purpose of this is so that when viewing my tasks I can have them sorted by categories for each client, but also have a higher value in the hierarchy for whose client they are. I then wanted to strip the task of the "BillingInformation" category since I am already using this information somewhere else, and having multiple categories in a task would lead to duplicate entries in my custom task view. However, I wanted to keep the client specific category in tact. This was trickier than I expected.
The final third of the macro cleans up some left over oddities from category names, sets the due date and reminder value of the new task, then opens and saves the new task.
This macro works perfect for what I was trying to do. You will need to customize to suit your specific needs, but I've left comments in the code that should help with that.
If you need help installing the macro see this article.
Monday, April 12, 2010
Automatically Format Names of Word Document
Good organization of your electronic files requires two key elements. First you need a logical and consistent folder hierarchy. Each client or project folder should have identical, or at least similar, folders corresponding to that particular client. Second, you need a consistent file naming procedure to organize files within each folder.
Many people include dates in file names in an attempt to organize their folders and find what they're looking for with a glance. However, too often people fall into the mm/dd/yyyy trap of dating their files. I get it, we're Americans, we were raised writing the date that way. If we were European we would likely name our files dd/mm/yyyy. However, computers are neither Americans nor European. If we want our files to be organized as best they can we need to learn to speak a bit of computer.
Shortfalls of conventional date formats
Your computer wants to organize things alphabetically and in descending order. What this means is that a letter titled 04-12-2010 - Letter to Joe.doc will be placed after 04-11-2010 - Letter to Jane.doc and before 04-15-2010 - Letter to Jim.doc. That's great so far, but we run into trouble when we change years. For example 04-12-2011 - Letter to Joe.doc when placed in the same folder will result in sorting like this:
04-11-2010 - Letter to Jane.docThe dates become jumbled. Our British friends' folders, would be even more chaotic. And people who put their dates at the end of the file name run into even more of a mess by sorting first by recipient then by date. Fortunately, the solution is simple. We change our date format to a YYYYMMDD format.
04-12-2010 - Letter to Joe.doc
04-12-2011 - Letter to Joe.doc
04-15-2010 - Letter to Jim.doc
A better date format method
Some people like YYYY-MM-DD, some like YYYY.MM.DD. I prefer YYYYMMDD because as applied to my preferred naming convention this method results in the least visually cluttered names.
In my folder the above examples would be formatted as:
20100411 - Letter to Jane.docMuch better right? But I'll be the first to admit that it's kind of a pain to write out those numbers and place them in front of each file name. Again, there is a simple solution, though it is likely a bit intimidating to the average Word user.
20100412 - Letter to Joe.doc
20100415 - Letter to Jim.doc
20110415 - Letter to Joe.doc
Scripting a solution
Mike has previously written on some of the basics of scripting here. By default Word's suggested Save As filename is the title of the document. Most users probably know that when they first "Save As" a document word picks up the first few words as a suggested file name. Behind the scenes word is actually substituting those words for the document's title field if no title has been defined.
The following script will define the title of the document as the current date in yyyymmdd format whenever a new file is opened:
Private Sub Document_New()

With Dialogs(wdDialogFileSummaryInfo)
.Title = CStr(Format(Now(), "yyyyMMdd "))
.Execute
End With

End Sub"yyyyMMdd " to "yyyy-MM-dd " or "yyyy.MM.dd ". However, avoid front and back slashes as they are not valid characters for file names.To apply this script we need to add it to whatever template that you base your documents on. If you want all of your documents you need to add it to your normal.dotm file.
- Open your normal.dotm template (or whatever template file you wish to apply this behavior to).
- Press alt+F11 to bring up the visual basic editor. If you have several files open you may see multiple projects on the left of the screen. (If you don't see the Project Viewer screen press Ctrl+R).
- Double click "ThisDocument" in the "Microsoft Word Objects" folder of the "Normal" project.
- Paste the above code in the code window.
- Save your work and close the Visual Basic editor.
Tuesday, December 29, 2009
SD Supreme Court opinions RSS feed
As many of our South Dakota readers know the SD UJS website got a face-lift recently. One of the several changes is an improved "Opinions" page. One shortcoming of the new design however is the lack of an RSS feed. Because of this I have created an RSS feed using the great tool over at Feed43.com.
Here's the link to the new RSS feed: http://feed43.com/sdsct_opinions.xml
The feed should only hit your feed reader with the new opinions and ignore old ones. Unfortunately there's no way for me to test this until they Supreme Court releases some new opinions.
Monday, November 23, 2009
CiteGenie is awesome
I can not believe it's taken me this long to write about CiteGenie. CiteGenie is a great firefox extension that I literally use every single day.
Cutting and pasting when doing legal research using your browser is simple. But having to construct the citation for what you pasted is not so simple. This is especially true with legal citations from sources like Westlaw. You have to stop and copy the case name separately, determine the pinpoint page numbers, and adjust the date and court name format.Basically, CiteGenie adds... oh well... I'll just let them tell you:
When CiteGenie™ is installed, it adds a new option to the browser's right-click menu to "Copy with CiteGenie." To use CiteGenie, simply highlight the text in the court opinion, right-click and select the "Copy with CiteGenie" option (or just press Ctrl-Shift-C). Then you can paste the text into any other program, such as your word processor, and the text will be pasted, along with the pinpoint citation for the selected text from the court opinion. This illustrated example shows CiteGenie™ in operation.CiteGenie can handle Bluebook or ALWD citation styles. Originally support was pretty limited to case law, but the author has consistently expanded support and more and more sources (eg. legal encyclopedias, periodicles, journals) are covered with each update.
CiteGenie comes with a 90 day free trial. CiteGenie Pro costs $14.97 and gives you the ability to install the Pro version on three separate computers (Office, Laptop, Home). Additional computers added for $4.99 apiece. There doesn't appear to be any difference in price for a commercial/personal license.
CiteGenie makes copying and pasting law from westlaw or lexis a no-brainer.
Saturday, August 29, 2009
Allwaysync as a Backup Solution for the Small Law Office
There are a number of strategies for protecting data. Vaulting, where data is kept backed up off-site, is one of the best. At the very minimum, some sort of redundancy is required.
I've been testing AllwaySync to keep a mobile laptop synchronized with the files I'm working with on the office network, to both keep files current and to protect the hard work I have put into creating them. The program works as advertised and it is fairly easy to set up. Just tell the program the folder on the local and remote computers to keep synchronized, analyze the folders, tell the program how to resolve conflicts, and sync. The program has an option to do a scheduled sync but I have yet to test it.


Wednesday, August 26, 2009
OfficeTab
The internets are abuzz this morning with posts about OfficeTab.
OfficeTab is an addon for Microsoft Word/Excel/Powerpoint that enables you to open multiple files within a single window using Firefox-like tabs. The initial reaction is that this is a great feature that should come standard with Word. One drawback that I've found in the short time I've been using it (the last 20 minutes) is that there is no obvious way to open two instances of Word for purposes of comparing two documents side by side. There is, of course, the "View Side by Side" option on the "View" tab. However, if you're like me and have dual monitors set up you would rather have two separate files open.
Additionally, there is some concern over the fact that this is a 5-day-old addon posted from an unknown chinese programmer with questionable Terms & Conditions language. See the links above.
Original Chinese Page | Translated Page | Direct Download
Thursday, July 2, 2009
Word blockquote tip
When is a quote more than just a quote? When it's a blockquote. And when is a quote a blockquote? The Blue Book § 5.1 and ALWD § 47.5 agree the magic number is 50 words or more. ALWD and The Elements of Legal Style § 4.9 both also direct use of a blockquote if the quote is 4 lines or longer of typed text; but that rule appears to be less universally accepted -- and is irrelevant for my tip today, so I've chosen to ignore it.
in Word there is a dead-simple way to measure if you've come up upon the 50-word-threshold. Highlight your quote (without citation) and look in the bottom left corner of the window.

Bam, the length of the selection is displayed. My quote here is 80 words so I'm applying my blockquote autostyle to it.
Monday, June 29, 2009
Convert Legal description to Longitude & Latitude
earthpoint.us has a great tool that came in handy for me just last week. If you're looking for the physical location of a property you can enter the township, range and section and convert that information to longitude and latitude (or vice versa). Very helpful in rural condemnation cases.
edit: this tool from the University of Montana appears to do the same thing.
Wednesday, June 24, 2009
Show Links to Appendices on SDCL website with Greasemonkey Userscript
I came up with a quick and dirty method of linking to the appendices on the SDCL website. Previously the only way (that I'd found) to get to them online was via a text search. I've created a userscript that adds links to the appendices of SDCL 15-6.
You must be using Firefox and have Greasemonkey installed. See the homepage here or install the script here.
I'd be happy to make more for any other specific chapters anyone suggests. Drop us an email at techoflaw@gmail.com with your request.
Tuesday, June 23, 2009
Easy Outlook Date Calculations
No more counting! No more counting! No more counting!
If you happened to be walking by my office door a few minutes ago you may have heard this cheer, followed by my clumsily tripping over a bankers box full of papers. OK, I didn't actually do a cheer (I did trip over the box though), but I was excited enough that I felt like doing one.
I just discovered a drop-dead simple way of setting future reminders in Outlook (ex, 30 days 'discovery responses due').
- Create a new appointment in your Outlook Calendar like you would anything else;
- Give it a subject;
- For the "Start Time" use a plain text description of what you want to do. It recognizes all sorts of text strings here's a few that I've tested and work for sure in Outlook 2003
- "30 days after today"
- "45 days after tomorrow"
- "3 days before June 25th" (a/k/a The "if-you-haven't-bought-an-anniversary-present-yet-drive -immediately-to-a-jewelry-store-you-idiot" reminder)
- "two weeks after today"
- unfortunately it doesn't seem to recognize "weekdays" or "business days" for the sub-11 day time periods.
- Hit "Tab" and then save the appointment.
Friday, May 15, 2009
Thursday, May 7, 2009
Platypus for easier Statute Navigation
Mike and I have mentioned the power of Greasemonkey here before. It can really be an amazing tool in customizing your web browsing, but also making your life as a lawyer easier. Today I was browsing through the Rules of Civil Appellate Procedure chapter of the code (fun, right?) at around the Length of Briefs section (66) of the nearly 100 sections therein - and in light of the fact that I knew I'd find myself on this very page again several times over the next few months or so - I knew there had to be an easier way to find what I'm looking for.
Of course when you're dealing with a specific, commonly used webpage a bookmark is always an option. However Ctrl+D was not what I was after today. Enter Platypus. Frankly, I don't remember if I've mentioned Platypus before or not, but if I had I would have told you it is a robust add-on for firefox that creates on-the-fly greasemonkey extensions which customize the way any given page appears and tailors them to your specific needs.
I knew that for my issue I was going to be coming back to this page over and over again and that I would want to easily find specific sections for reference. Using Platypus I was able to highlight sections that I knew I would want to reference later as well as highlight and bold the really important ones. For example, References in Briefs to Parties, congratulations, you are important to me and you are hereby hilighted. However, Mr. Printing and Binding Specifications for Briefs, you are very important to me (owing to my experience in having a brief kicked back because one paragraph, one paragraph, was improperly aligned) and you are therefore now highlighted and bold.
Here's a side-by-side before and after of the page:

As you can see, the links on the left run together and unless you know the specific section number off the top of your head, you're going to be reading titles. On the right however, your eye quickly jumps to the sections that you have designated.
Platypus is simple to use. Once you've installed the extension you simply right click on any page that you want to customize and select Platypus! from the context menu.

You will initially notice that areas of the page are turned red when you run your mouse over them. These are areas that are editable on the page. If there is one weakness to Platypus it's that you are at the mercy of the code and layout used by the designer as far as areas that are editable. The SD Statute Chapters are a good example. It would be much more desireable to highlight the entire title of the individual section along with its link, but because of the way the HTML of the page is rendered that's not an easy option in this instance. To edit the style of an area mouse over an editable area and right click again. Now you're looking at the Platypus context menu.

There are several options and they can all be valuable depending on what you want to do on a page. In this instance we want to edit the style of the page so click Set Style. A new menu will pop up with several options. To highlight find the Background Color and select yellow (or your choice), if your done click Accept, to preview click Apply. If you want to make the text of an area bold that's under the Font Weight option.
Once you've made and accepted your changes it is very important that you Save your changes. Before navigating away from the page your editing click Save and Exit Platypus on the Platypus Context Menu. A greasemonkey script will (should) then install and your changes are saved.
Sunday, April 12, 2009
MOTD: Auto-update the date
In my template, I inserted a date field by going to Word's Insert tab
 and clicking Quick Parts
  and then selecting Date from the Field names list (you can use SaveDate if you want - see this post for more about the SaveDate field). The Date field displays the current date. The Date formats box is used to control how the date is displayed. The box uses a code system; "d" stands for day, "M" stands for month, "y" stands for year, "h" stands for hour, "m" stands for minute, and "s" stands for second. Note that you capitalize M for month because lower case m stands for minute. The formating is a little difficult to explain so examples are the only way to go. If you want the date to be formatted like "3/15/09", type M/d/yy. For "3/15/2009," type M/d/yyyy. For "Sunday, March 15, 2009," type dddd, MMMM dd, yyyy. Most of the common formats are in the list so you don't generally need to figure the formatting out. However, I want to do something out of the ordinary. I want the document to read something like "Executed on the 1st," so clear out the Date formats box and just place a "d" there.
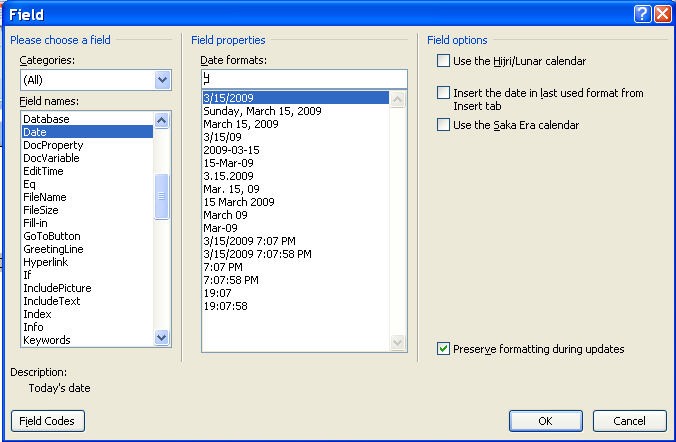
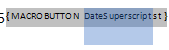
Right after the Date box we just inserted, insert a MacroField by selecting MacroField from the Field names list. In the Display text box put something like "st" (because this box will say "st", "nd", or "rd"). In the Macro name box just leave the default there (AcceptAllChangesInDoc) because we will add our own Macro next. Your document looks something like this:

Click on the "st" and type Shift + F9. This will expand the MacroField to display its code. Replace AcceptAllChangesInDoc with DateSuperScript - the name of the macro we will make next.
I want the month and the year at the end so I insert a second Date field using the code MMMM, yyyy.

The finished product looks like this:

Now type Alt + F11 to open up the Visual Basic editor. Then select the Project template for your document in the project window (it will have the name of your Word document). Expand the project. Expand the Microsoft Word Objects tab and select the ThisDocument icon and then paste this code in the document:
Sub AutoSuperScript()
Dim oStory As Range
Dim oField As Field
For Each oStory In ActiveDocument.StoryRanges
For Each oField In oStory.Fields
If InStr(1, oField.Code.Text, " MACROBUTTON DateSuperscript") Then
oField.Code.Text = " MACROBUTTON DateSuperscript " + GetDateSuperscript
End If
oField.Update
Next oField
Next oStory
End Sub
Private Sub Document_New()
AutoSuperScript
End Sub
Private Function GetDateSuperscript()
'1-> st
'2->nd
'3->rd
'0, >3 ->th
strDt = Str(Day(Now))
strEnd = Right(strDt, 1)
If strEnd = 1 Then
GetDateSuperscript = "st"
ElseIf strEnd = 2 Then
GetDateSuperscript = "nd"
ElseIf strEnd = 3 Then
GetDateSuperscript = "rd"
Else
GetDateSuperscript = "th"
End If
End Function
Now every time you create a new document from your template the date will be updated. If you really want to get wild, add the AutoSuperScript function to the UpdateAll function I talked about in this post. That way, the superscript will get updated every save.

Sunday, April 5, 2009
MOTD: Print Current Page Shortcut
Sub PrintCurrent()
'
' PrintCurrent Macro
' Macro recorded 3/9/2009 by Michael Shubeck
'
Application.PrintOut FileName:="", Range:=wdPrintCurrentPage, Item:= _
wdPrintDocumentContent, Copies:=1, Pages:="", PageType:=wdPrintAllPages, _
ManualDuplexPrint:=False, Collate:=True, Background:=True, PrintToFile:= _
False, PrintZoomColumn:=0, PrintZoomRow:=0, PrintZoomPaperWidth:=0, _
PrintZoomPaperHeight:=0
End Sub

Sunday, March 29, 2009
MOTD: Insert Merge Field
Sub InsertMergeField() 'ALT CTRL M
'
' InsertMergeField Macro
' Macro recorded 3/13/2009 by Michael Shubeck
'
Selection.Fields.Add Range:=Selection.Range, Type:=wdFieldEmpty, Text:= _
"MERGEFIELD INSERT ", PreserveFormatting:=True
Selection.MoveLeft Unit:=wdCharacter, Count:=1
Selection.Fields.ToggleShowCodes
End Sub

Sunday, March 22, 2009
Macro of the Day (MOTD): Keybord Shortcut For Envelope Printing
In the Project window on the left side of the Visual Basic editor, open up the Normal tab and the Microsoft Word Objects tab under that. Double click on the ThisDocument icon. Paste the following code in.
Sub PrintEnvelope()
'
' PrintEnvelope Macro
' Macro recorded 3/10/2009 by Michael Shubeck
'
ActiveDocument.Envelope.PrintOut ExtractAddress:=False, OmitReturnAddress _
:=True, PrintBarCode:=False, PrintFIMA:=False, Height:=InchesToPoints( _
4.13), Width:=InchesToPoints(9.5), Address:=Selection.Text, AutoText _
:="ToolsCreateLabels3", ReturnAddress:= _
"The Law Offices of Gregory A. Yates", ReturnAutoText:= _
"ToolsCreateLabels2", AddressFromLeft:=wdAutoPosition, AddressFromTop:= _
wdAutoPosition, ReturnAddressFromLeft:=wdAutoPosition, _
ReturnAddressFromTop:=wdAutoPosition, DefaultOrientation:=wdLeftLandscape _
, DefaultFaceUp:=False, PrintEPostage:=False
End Sub
Now lets hook the macro up to a keyboard shortcut. In Word 2007, click on the Office Button
 Then click on Word Options at the bottom of the menu that pops out. Then hit the Customize tab. Finally, at the bottom of the Customize window, hit the customize keyboard shortcuts button. In the Categories box, scroll down to Macros. Then, in the Macros box, select our PrintEnvelope macro. Now, click in the Press New Shortcut Key box. Type the key combination that you want to assign to the macro. If the key combination is already used it, the window will show text that says "Currently assigned to." Usually I just replace what was assigned by the Microsoft people because they have shortcuts for features I will never use. Finally, hit the Assign button (don't forget this - I do all the time).
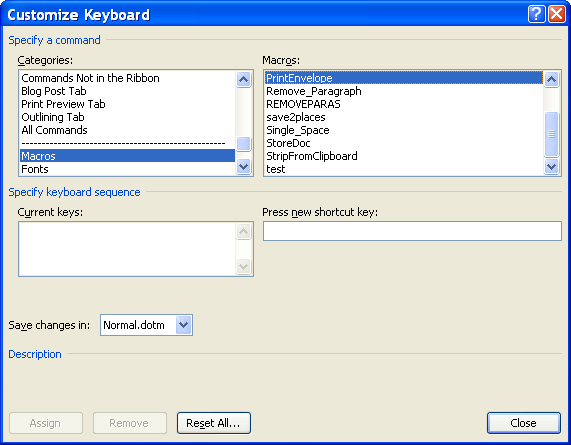
Now you can highlight a person's address in your document, use your shortcut, and the envelope will print.
As a final note, watch out where the envelpe prints if you have multiple printers installed. The envelope will print to the printer listed in the print menu.
