


As many of our South Dakota readers know the SD UJS website got a face-lift recently. One of the several changes is an improved "Opinions" page. One shortcoming of the new design however is the lack of an RSS feed. Because of this I have created an RSS feed using the great tool over at Feed43.com.
Here's the link to the new RSS feed: http://feed43.com/sdsct_opinions.xml
The feed should only hit your feed reader with the new opinions and ignore old ones. Unfortunately there's no way for me to test this until they Supreme Court releases some new opinions.
Tuesday, December 29, 2009
SD Supreme Court opinions RSS feed
Monday, November 23, 2009
CiteGenie is awesome
I can not believe it's taken me this long to write about CiteGenie. CiteGenie is a great firefox extension that I literally use every single day.
Cutting and pasting when doing legal research using your browser is simple. But having to construct the citation for what you pasted is not so simple. This is especially true with legal citations from sources like Westlaw. You have to stop and copy the case name separately, determine the pinpoint page numbers, and adjust the date and court name format.Basically, CiteGenie adds... oh well... I'll just let them tell you:
When CiteGenie™ is installed, it adds a new option to the browser's right-click menu to "Copy with CiteGenie." To use CiteGenie, simply highlight the text in the court opinion, right-click and select the "Copy with CiteGenie" option (or just press Ctrl-Shift-C). Then you can paste the text into any other program, such as your word processor, and the text will be pasted, along with the pinpoint citation for the selected text from the court opinion. This illustrated example shows CiteGenie™ in operation.CiteGenie can handle Bluebook or ALWD citation styles. Originally support was pretty limited to case law, but the author has consistently expanded support and more and more sources (eg. legal encyclopedias, periodicles, journals) are covered with each update.
CiteGenie comes with a 90 day free trial. CiteGenie Pro costs $14.97 and gives you the ability to install the Pro version on three separate computers (Office, Laptop, Home). Additional computers added for $4.99 apiece. There doesn't appear to be any difference in price for a commercial/personal license.
CiteGenie makes copying and pasting law from westlaw or lexis a no-brainer.
Saturday, August 29, 2009
Allwaysync as a Backup Solution for the Small Law Office
As the techie in the office, I am responsible for the data backup strategy. To put it simply, think back to college when you were pulling that all nighter to finish the final paper and you got that blue screen of death and the smart ass passing by said "hope you saved." With the ever increasing move to digital file keeping in the legal world testing fate is no longer an option.
There are a number of strategies for protecting data. Vaulting, where data is kept backed up off-site, is one of the best. At the very minimum, some sort of redundancy is required.
I've been testing AllwaySync to keep a mobile laptop synchronized with the files I'm working with on the office network, to both keep files current and to protect the hard work I have put into creating them. The program works as advertised and it is fairly easy to set up. Just tell the program the folder on the local and remote computers to keep synchronized, analyze the folders, tell the program how to resolve conflicts, and sync. The program has an option to do a scheduled sync but I have yet to test it.


AllwaySync is free for personal use.
There are a number of strategies for protecting data. Vaulting, where data is kept backed up off-site, is one of the best. At the very minimum, some sort of redundancy is required.
I've been testing AllwaySync to keep a mobile laptop synchronized with the files I'm working with on the office network, to both keep files current and to protect the hard work I have put into creating them. The program works as advertised and it is fairly easy to set up. Just tell the program the folder on the local and remote computers to keep synchronized, analyze the folders, tell the program how to resolve conflicts, and sync. The program has an option to do a scheduled sync but I have yet to test it.

Wednesday, August 26, 2009
OfficeTab
The internets are abuzz this morning with posts about OfficeTab.
OfficeTab is an addon for Microsoft Word/Excel/Powerpoint that enables you to open multiple files within a single window using Firefox-like tabs. The initial reaction is that this is a great feature that should come standard with Word. One drawback that I've found in the short time I've been using it (the last 20 minutes) is that there is no obvious way to open two instances of Word for purposes of comparing two documents side by side. There is, of course, the "View Side by Side" option on the "View" tab. However, if you're like me and have dual monitors set up you would rather have two separate files open.
Additionally, there is some concern over the fact that this is a 5-day-old addon posted from an unknown chinese programmer with questionable Terms & Conditions language. See the links above.
Original Chinese Page | Translated Page | Direct Download
Thursday, July 2, 2009
Word blockquote tip
When is a quote more than just a quote? When it's a blockquote. And when is a quote a blockquote? The Blue Book § 5.1 and ALWD § 47.5 agree the magic number is 50 words or more. ALWD and The Elements of Legal Style § 4.9 both also direct use of a blockquote if the quote is 4 lines or longer of typed text; but that rule appears to be less universally accepted -- and is irrelevant for my tip today, so I've chosen to ignore it.
in Word there is a dead-simple way to measure if you've come up upon the 50-word-threshold. Highlight your quote (without citation) and look in the bottom left corner of the window.

Bam, the length of the selection is displayed. My quote here is 80 words so I'm applying my blockquote autostyle to it.
Monday, June 29, 2009
Convert Legal description to Longitude & Latitude
earthpoint.us has a great tool that came in handy for me just last week. If you're looking for the physical location of a property you can enter the township, range and section and convert that information to longitude and latitude (or vice versa). Very helpful in rural condemnation cases.
edit: this tool from the University of Montana appears to do the same thing.
Wednesday, June 24, 2009
Show Links to Appendices on SDCL website with Greasemonkey Userscript
I came up with a quick and dirty method of linking to the appendices on the SDCL website. Previously the only way (that I'd found) to get to them online was via a text search. I've created a userscript that adds links to the appendices of SDCL 15-6.
You must be using Firefox and have Greasemonkey installed. See the homepage here or install the script here.
I'd be happy to make more for any other specific chapters anyone suggests. Drop us an email at techoflaw@gmail.com with your request.
Tuesday, June 23, 2009
Easy Outlook Date Calculations
No more counting! No more counting! No more counting!
If you happened to be walking by my office door a few minutes ago you may have heard this cheer, followed by my clumsily tripping over a bankers box full of papers. OK, I didn't actually do a cheer (I did trip over the box though), but I was excited enough that I felt like doing one.
I just discovered a drop-dead simple way of setting future reminders in Outlook (ex, 30 days 'discovery responses due').
- Create a new appointment in your Outlook Calendar like you would anything else;
- Give it a subject;
- For the "Start Time" use a plain text description of what you want to do. It recognizes all sorts of text strings here's a few that I've tested and work for sure in Outlook 2003
- "30 days after today"
- "45 days after tomorrow"
- "3 days before June 25th" (a/k/a The "if-you-haven't-bought-an-anniversary-present-yet-drive -immediately-to-a-jewelry-store-you-idiot" reminder)
- "two weeks after today"
- unfortunately it doesn't seem to recognize "weekdays" or "business days" for the sub-11 day time periods.
- Hit "Tab" and then save the appointment.
Friday, May 15, 2009
Thursday, May 7, 2009
Platypus for easier Statute Navigation
Mike and I have mentioned the power of Greasemonkey here before. It can really be an amazing tool in customizing your web browsing, but also making your life as a lawyer easier. Today I was browsing through the Rules of Civil Appellate Procedure chapter of the code (fun, right?) at around the Length of Briefs section (66) of the nearly 100 sections therein - and in light of the fact that I knew I'd find myself on this very page again several times over the next few months or so - I knew there had to be an easier way to find what I'm looking for.
Of course when you're dealing with a specific, commonly used webpage a bookmark is always an option. However Ctrl+D was not what I was after today. Enter Platypus. Frankly, I don't remember if I've mentioned Platypus before or not, but if I had I would have told you it is a robust add-on for firefox that creates on-the-fly greasemonkey extensions which customize the way any given page appears and tailors them to your specific needs.
I knew that for my issue I was going to be coming back to this page over and over again and that I would want to easily find specific sections for reference. Using Platypus I was able to highlight sections that I knew I would want to reference later as well as highlight and bold the really important ones. For example, References in Briefs to Parties, congratulations, you are important to me and you are hereby hilighted. However, Mr. Printing and Binding Specifications for Briefs, you are very important to me (owing to my experience in having a brief kicked back because one paragraph, one paragraph, was improperly aligned) and you are therefore now highlighted and bold.
Here's a side-by-side before and after of the page:

As you can see, the links on the left run together and unless you know the specific section number off the top of your head, you're going to be reading titles. On the right however, your eye quickly jumps to the sections that you have designated.
Platypus is simple to use. Once you've installed the extension you simply right click on any page that you want to customize and select Platypus! from the context menu.

You will initially notice that areas of the page are turned red when you run your mouse over them. These are areas that are editable on the page. If there is one weakness to Platypus it's that you are at the mercy of the code and layout used by the designer as far as areas that are editable. The SD Statute Chapters are a good example. It would be much more desireable to highlight the entire title of the individual section along with its link, but because of the way the HTML of the page is rendered that's not an easy option in this instance. To edit the style of an area mouse over an editable area and right click again. Now you're looking at the Platypus context menu.

There are several options and they can all be valuable depending on what you want to do on a page. In this instance we want to edit the style of the page so click Set Style. A new menu will pop up with several options. To highlight find the Background Color and select yellow (or your choice), if your done click Accept, to preview click Apply. If you want to make the text of an area bold that's under the Font Weight option.
Once you've made and accepted your changes it is very important that you Save your changes. Before navigating away from the page your editing click Save and Exit Platypus on the Platypus Context Menu. A greasemonkey script will (should) then install and your changes are saved.
Sunday, April 12, 2009
MOTD: Auto-update the date
I've talked before about making Word templates out of commonly used documents. I've also talked about date fields and SaveDate fields. Some documents might use language like "Executed this 15th day of March, 2009." There isn't a good way to have the day read "2nd", "3rd", "4th" ect. Now most people might think this isn't a big deal, its easily changed manually. But the whole point of my template is to cut down on ugly typos when I forget to update something. So, I created a macro.
In my template, I inserted a date field by going to Word's Insert tab and clicking Quick Parts
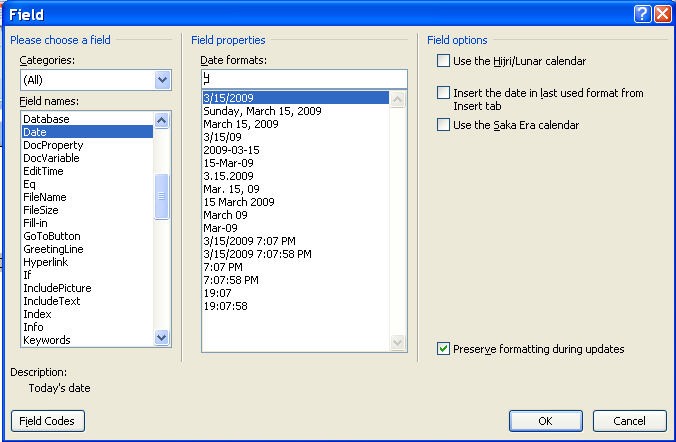
  and then selecting Date from the Field names list (you can use SaveDate if you want - see this post for more about the SaveDate field). The Date field displays the current date. The Date formats box is used to control how the date is displayed. The box uses a code system; "d" stands for day, "M" stands for month, "y" stands for year, "h" stands for hour, "m" stands for minute, and "s" stands for second. Note that you capitalize M for month because lower case m stands for minute. The formating is a little difficult to explain so examples are the only way to go. If you want the date to be formatted like "3/15/09", type M/d/yy. For "3/15/2009," type M/d/yyyy. For "Sunday, March 15, 2009," type dddd, MMMM dd, yyyy. Most of the common formats are in the list so you don't generally need to figure the formatting out. However, I want to do something out of the ordinary. I want the document to read something like "Executed on the 1st," so clear out the Date formats box and just place a "d" there.
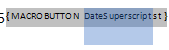
Right after the Date box we just inserted, insert a MacroField by selecting MacroField from the Field names list. In the Display text box put something like "st" (because this box will say "st", "nd", or "rd"). In the Macro name box just leave the default there (AcceptAllChangesInDoc) because we will add our own Macro next. Your document looks something like this:

Click on the "st" and type Shift + F9. This will expand the MacroField to display its code. Replace AcceptAllChangesInDoc with DateSuperScript - the name of the macro we will make next.
I want the month and the year at the end so I insert a second Date field using the code MMMM, yyyy.

The finished product looks like this:

Now type Alt + F11 to open up the Visual Basic editor. Then select the Project template for your document in the project window (it will have the name of your Word document). Expand the project. Expand the Microsoft Word Objects tab and select the ThisDocument icon and then paste this code in the document:
Sub AutoSuperScript()
Dim oStory As Range
Dim oField As Field
For Each oStory In ActiveDocument.StoryRanges
For Each oField In oStory.Fields
If InStr(1, oField.Code.Text, " MACROBUTTON DateSuperscript") Then
oField.Code.Text = " MACROBUTTON DateSuperscript " + GetDateSuperscript
End If
oField.Update
Next oField
Next oStory
End Sub
Private Sub Document_New()
AutoSuperScript
End Sub
Private Function GetDateSuperscript()
'1-> st
'2->nd
'3->rd
'0, >3 ->th
strDt = Str(Day(Now))
strEnd = Right(strDt, 1)
If strEnd = 1 Then
GetDateSuperscript = "st"
ElseIf strEnd = 2 Then
GetDateSuperscript = "nd"
ElseIf strEnd = 3 Then
GetDateSuperscript = "rd"
Else
GetDateSuperscript = "th"
End If
End Function
Now every time you create a new document from your template the date will be updated. If you really want to get wild, add the AutoSuperScript function to the UpdateAll function I talked about in this post. That way, the superscript will get updated every save.

In my template, I inserted a date field by going to Word's Insert tab
and clicking Quick Parts and then selecting Date from the Field names list (you can use SaveDate if you want - see this post for more about the SaveDate field). The Date field displays the current date. The Date formats box is used to control how the date is displayed. The box uses a code system; "d" stands for day, "M" stands for month, "y" stands for year, "h" stands for hour, "m" stands for minute, and "s" stands for second. Note that you capitalize M for month because lower case m stands for minute. The formating is a little difficult to explain so examples are the only way to go. If you want the date to be formatted like "3/15/09", type M/d/yy. For "3/15/2009," type M/d/yyyy. For "Sunday, March 15, 2009," type dddd, MMMM dd, yyyy. Most of the common formats are in the list so you don't generally need to figure the formatting out. However, I want to do something out of the ordinary. I want the document to read something like "Executed on the 1st," so clear out the Date formats box and just place a "d" there. Right after the Date box we just inserted, insert a MacroField by selecting MacroField from the Field names list. In the Display text box put something like "st" (because this box will say "st", "nd", or "rd"). In the Macro name box just leave the default there (AcceptAllChangesInDoc) because we will add our own Macro next. Your document looks something like this:
Click on the "st" and type Shift + F9. This will expand the MacroField to display its code. Replace AcceptAllChangesInDoc with DateSuperScript - the name of the macro we will make next.
I want the month and the year at the end so I insert a second Date field using the code MMMM, yyyy.
The finished product looks like this:
Now type Alt + F11 to open up the Visual Basic editor. Then select the Project template for your document in the project window (it will have the name of your Word document). Expand the project. Expand the Microsoft Word Objects tab and select the ThisDocument icon and then paste this code in the document:
Sub AutoSuperScript()
Dim oStory As Range
Dim oField As Field
For Each oStory In ActiveDocument.StoryRanges
For Each oField In oStory.Fields
If InStr(1, oField.Code.Text, " MACROBUTTON DateSuperscript") Then
oField.Code.Text = " MACROBUTTON DateSuperscript " + GetDateSuperscript
End If
oField.Update
Next oField
Next oStory
End Sub
Private Sub Document_New()
AutoSuperScript
End Sub
Private Function GetDateSuperscript()
'1-> st
'2->nd
'3->rd
'0, >3 ->th
strDt = Str(Day(Now))
strEnd = Right(strDt, 1)
If strEnd = 1 Then
GetDateSuperscript = "st"
ElseIf strEnd = 2 Then
GetDateSuperscript = "nd"
ElseIf strEnd = 3 Then
GetDateSuperscript = "rd"
Else
GetDateSuperscript = "th"
End If
End Function
Now every time you create a new document from your template the date will be updated. If you really want to get wild, add the AutoSuperScript function to the UpdateAll function I talked about in this post. That way, the superscript will get updated every save.
Sunday, April 5, 2009
MOTD: Print Current Page Shortcut
I use the print current page setting in the Print dialog of Word enough that I recorded a macro for it. I simply recorded a macro without editing any code so you can record it yourself using this post and this post, or you can put the following code in the Normal template and assign a shortcut to it (use this post):
Sub PrintCurrent()
'
' PrintCurrent Macro
' Macro recorded 3/9/2009 by Michael Shubeck
'
Application.PrintOut FileName:="", Range:=wdPrintCurrentPage, Item:= _
wdPrintDocumentContent, Copies:=1, Pages:="", PageType:=wdPrintAllPages, _
ManualDuplexPrint:=False, Collate:=True, Background:=True, PrintToFile:= _
False, PrintZoomColumn:=0, PrintZoomRow:=0, PrintZoomPaperWidth:=0, _
PrintZoomPaperHeight:=0
End Sub
Sunday, March 29, 2009
MOTD: Insert Merge Field
I've posted before about the amazing potential of Word's Mail Merge feature, I use it so much that I've created a macro to insert MergeFields when I'm creating a merge document. I then assign the macro to a shortcut so I can quickly insert these fields in my documents. I simply recorded a macro without editing any code so you can record it yourself using this post and this post, or you can put the following code in the Normal template and assign a shortcut to it (use this post):
Sub InsertMergeField() 'ALT CTRL M
'
' InsertMergeField Macro
' Macro recorded 3/13/2009 by Michael Shubeck
'
Selection.Fields.Add Range:=Selection.Range, Type:=wdFieldEmpty, Text:= _
"MERGEFIELD INSERT ", PreserveFormatting:=True
Selection.MoveLeft Unit:=wdCharacter, Count:=1
Selection.Fields.ToggleShowCodes
End Sub
Sunday, March 22, 2009
Macro of the Day (MOTD): Keybord Shortcut For Envelope Printing
I do a lot of envelope printing in my job and I use Word's Envelope Wizard to do most of my envelope printing. I don't know why they have a whole wizard for this though. I would prefer if I could simply highlight the person's address in the letter I was drafting, type a shortcut, and have it print. So, I created a macro. Type Alt + F11 to open the Visual Basic editor. I would put this code in the Normal template. The Normal template is the basis for all Word documents. By putting code there, it will run in any document you are using.
In the Project window on the left side of the Visual Basic editor, open up the Normal tab and the Microsoft Word Objects tab under that. Double click on the ThisDocument icon. Paste the following code in.
Sub PrintEnvelope()
'
' PrintEnvelope Macro
' Macro recorded 3/10/2009 by Michael Shubeck
'
ActiveDocument.Envelope.PrintOut ExtractAddress:=False, OmitReturnAddress _
:=True, PrintBarCode:=False, PrintFIMA:=False, Height:=InchesToPoints( _
4.13), Width:=InchesToPoints(9.5), Address:=Selection.Text, AutoText _
:="ToolsCreateLabels3", ReturnAddress:= _
"The Law Offices of Gregory A. Yates", ReturnAutoText:= _
"ToolsCreateLabels2", AddressFromLeft:=wdAutoPosition, AddressFromTop:= _
wdAutoPosition, ReturnAddressFromLeft:=wdAutoPosition, _
ReturnAddressFromTop:=wdAutoPosition, DefaultOrientation:=wdLeftLandscape _
, DefaultFaceUp:=False, PrintEPostage:=False
End Sub
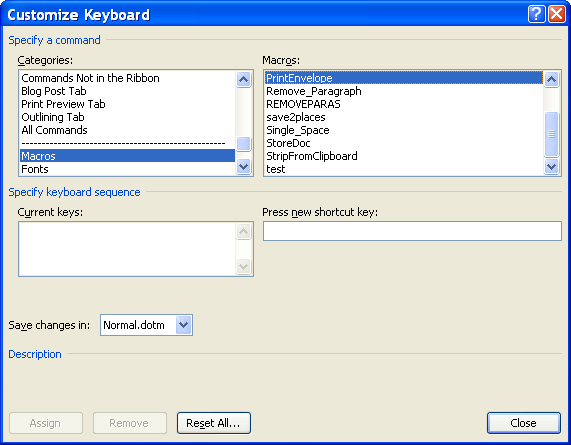
Now lets hook the macro up to a keyboard shortcut. In Word 2007, click on the Office Button Then click on Word Options at the bottom of the menu that pops out. Then hit the Customize tab. Finally, at the bottom of the Customize window, hit the customize keyboard shortcuts button. In the Categories box, scroll down to Macros. Then, in the Macros box, select our PrintEnvelope macro. Now, click in the Press New Shortcut Key box. Type the key combination that you want to assign to the macro. If the key combination is already used it, the window will show text that says "Currently assigned to." Usually I just replace what was assigned by the Microsoft people because they have shortcuts for features I will never use. Finally, hit the Assign button (don't forget this - I do all the time).
Now you can highlight a person's address in your document, use your shortcut, and the envelope will print.
As a final note, watch out where the envelpe prints if you have multiple printers installed. The envelope will print to the printer listed in the print menu.

In the Project window on the left side of the Visual Basic editor, open up the Normal tab and the Microsoft Word Objects tab under that. Double click on the ThisDocument icon. Paste the following code in.
Sub PrintEnvelope()
'
' PrintEnvelope Macro
' Macro recorded 3/10/2009 by Michael Shubeck
'
ActiveDocument.Envelope.PrintOut ExtractAddress:=False, OmitReturnAddress _
:=True, PrintBarCode:=False, PrintFIMA:=False, Height:=InchesToPoints( _
4.13), Width:=InchesToPoints(9.5), Address:=Selection.Text, AutoText _
:="ToolsCreateLabels3", ReturnAddress:= _
"The Law Offices of Gregory A. Yates", ReturnAutoText:= _
"ToolsCreateLabels2", AddressFromLeft:=wdAutoPosition, AddressFromTop:= _
wdAutoPosition, ReturnAddressFromLeft:=wdAutoPosition, _
ReturnAddressFromTop:=wdAutoPosition, DefaultOrientation:=wdLeftLandscape _
, DefaultFaceUp:=False, PrintEPostage:=False
End Sub
Now lets hook the macro up to a keyboard shortcut. In Word 2007, click on the Office Button
Then click on Word Options at the bottom of the menu that pops out. Then hit the Customize tab. Finally, at the bottom of the Customize window, hit the customize keyboard shortcuts button. In the Categories box, scroll down to Macros. Then, in the Macros box, select our PrintEnvelope macro. Now, click in the Press New Shortcut Key box. Type the key combination that you want to assign to the macro. If the key combination is already used it, the window will show text that says "Currently assigned to." Usually I just replace what was assigned by the Microsoft people because they have shortcuts for features I will never use. Finally, hit the Assign button (don't forget this - I do all the time).Now you can highlight a person's address in your document, use your shortcut, and the envelope will print.
As a final note, watch out where the envelpe prints if you have multiple printers installed. The envelope will print to the printer listed in the print menu.
Sunday, March 15, 2009
MOTD: Autoupdate fields on save
This will be the first of a series of posts on cool Microsoft Word macros I have been using to make me more efficient at producing documents and cut down on embarrassing errors. Bill and I have been preaching the benefits of macros for a while on this blog. Check this post out for an introduction.
I use templates for all of my commonly used documents, from my basic letter or fax template to more complex pleading documents. I have discussed how to create templates before. Word allows you to insert blanks called fields in a document. These fields will automatically fill in information at certain times. In many of my templates I have fields that automatically fill in the date or generate tables of contents, among other things. These fields all need to be manually updated by right clicking on them and clicking update. Sometimes I forget to update the field before printing so I created a macro to automatically update the fields when I hit the save button. Credit goes to these blog posts: 1, 2.
For experimentation, create a template using the procedures from the creating templates tutorial. Then insert a save date field in that template. In Office 2007, you go to the Insert tab on the Ribbon bar. Next, go to the Quick Parts button . Then select the Field menu item.
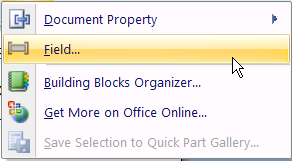
In the Field dialog, select SaveDate. Select whatever date format you desire.
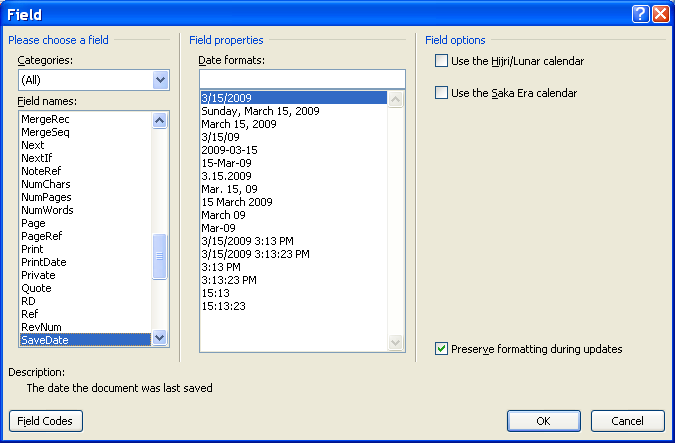
A SaveDate field displays the date the document was saved (after it is updated) and, thus, is handy for letters and other documents that are printed and sent on the date they are saved.
Now lets bring up the Visual Basic editor so we can start adding some code, type Alt + F11. In the Project window on the left, find the letter project and right click on it. Next click insert -> module.
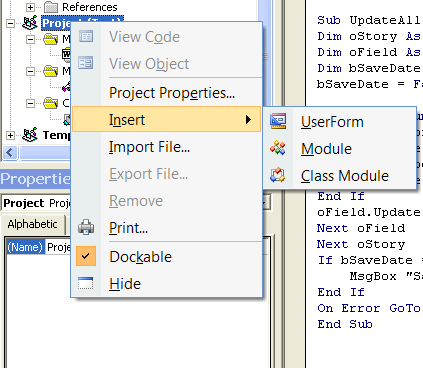
A new item called a code module will be inserted under your project in a modules folder. It will be named Module1.
Now insert a new class module just like you inserted the code module. The class module will be named Class1.
Your Project window should look like this:
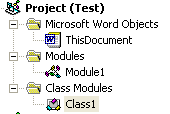
The specifics of what ThisDocument, Module1, and Class1 are not very important at this point so I wont go into detail. We will just paste code to make things work. If you have a desire to understand code, see here.
Double click on the ThisDocument icon in the Project window. Now paste the following code into the code window:
Private Sub Document_New() 'has to be Document_New not Document_Open for it to work in a template
Call Register_Event_Handler
End Sub
Now double click on the Module1 icon and paste this code in:
Dim X As New Class1
Public Sub Register_Event_Handler()
Set X.App = Word.Application
End Sub
Finally, paste this code into Class1:
Public WithEvents App As Word.Application
Private Sub App_DocumentBeforeSave(ByVal Doc As Document, SaveAsUI As Boolean, Cancel As Boolean)
UpdateAll
End Sub
Sub UpdateAll()
Dim oStory As Range
Dim oField As Field
Dim bSaveDate As Boolean
bSaveDate = False
On Error Resume Next
For Each oStory In ActiveDocument.StoryRanges
For Each oField In oStory.Fields
If oField.Type = wdFieldSaveDate Then
bSaveDate = True
End If
oField.Update
Next oField
Next oStory
If bSaveDate = True Then
MsgBox "Save a second time to update a save date field"
End If
On Error GoTo 0
End Sub
SaveDate fields present a special paradox. The document has to be saved before the field can be updated. I have the following code to remind me to press save twice to update the field:
If bSaveDate = True Then
MsgBox "Save a second time to update a save date field"
End If
Now save the template and double click on the template file to create a new document using that template. When you hit save the message box will remind you to save a second time, and when you do, the date field will be updated automatically.
This same code will automatically update tables of contents, numbering and any other Word field that automatically generates information.

I use templates for all of my commonly used documents, from my basic letter or fax template to more complex pleading documents. I have discussed how to create templates before. Word allows you to insert blanks called fields in a document. These fields will automatically fill in information at certain times. In many of my templates I have fields that automatically fill in the date or generate tables of contents, among other things. These fields all need to be manually updated by right clicking on them and clicking update. Sometimes I forget to update the field before printing so I created a macro to automatically update the fields when I hit the save button. Credit goes to these blog posts: 1, 2.
For experimentation, create a template using the procedures from the creating templates tutorial. Then insert a save date field in that template. In Office 2007, you go to the Insert tab on the Ribbon bar
. Next, go to the Quick Parts button . Then select the Field menu item. In the Field dialog, select SaveDate. Select whatever date format you desire.
A SaveDate field displays the date the document was saved (after it is updated) and, thus, is handy for letters and other documents that are printed and sent on the date they are saved.
Now lets bring up the Visual Basic editor so we can start adding some code, type Alt + F11. In the Project window on the left, find the letter project and right click on it. Next click insert -> module.
A new item called a code module will be inserted under your project in a modules folder. It will be named Module1.
Now insert a new class module just like you inserted the code module. The class module will be named Class1.
Your Project window should look like this:
The specifics of what ThisDocument, Module1, and Class1 are not very important at this point so I wont go into detail. We will just paste code to make things work. If you have a desire to understand code, see here.
Double click on the ThisDocument icon in the Project window. Now paste the following code into the code window:
Private Sub Document_New() 'has to be Document_New not Document_Open for it to work in a template
Call Register_Event_Handler
End Sub
Now double click on the Module1 icon and paste this code in:
Dim X As New Class1
Public Sub Register_Event_Handler()
Set X.App = Word.Application
End Sub
Finally, paste this code into Class1:
Public WithEvents App As Word.Application
Private Sub App_DocumentBeforeSave(ByVal Doc As Document, SaveAsUI As Boolean, Cancel As Boolean)
UpdateAll
End Sub
Sub UpdateAll()
Dim oStory As Range
Dim oField As Field
Dim bSaveDate As Boolean
bSaveDate = False
On Error Resume Next
For Each oStory In ActiveDocument.StoryRanges
For Each oField In oStory.Fields
If oField.Type = wdFieldSaveDate Then
bSaveDate = True
End If
oField.Update
Next oField
Next oStory
If bSaveDate = True Then
MsgBox "Save a second time to update a save date field"
End If
On Error GoTo 0
End Sub
SaveDate fields present a special paradox. The document has to be saved before the field can be updated. I have the following code to remind me to press save twice to update the field:
If bSaveDate = True Then
MsgBox "Save a second time to update a save date field"
End If
Now save the template and double click on the template file to create a new document using that template. When you hit save the message box will remind you to save a second time, and when you do, the date field will be updated automatically.
This same code will automatically update tables of contents, numbering and any other Word field that automatically generates information.
Thursday, February 19, 2009
Word shortcut of the day: Ctrl+Shift+A
Hello there, it's been a while. Just wanted to stop by amid my dilligent work protecting the rights of innocent South Dakotan's to pollute and drop by a little tip I thought needed sharing.
When you're working in Word and you need a section in all capitals select it and press Ctrl+Shift+A. The same combination returns it to the normal case setting. I use this in my captions and for section headings in briefs quites a bit. Hope it helps.
See you in another 6 months! just kidding (hopefully)
Monday, February 16, 2009
Sync Mobile Contacts to Gmail
Google has finally implemented something that users have been requesting for years, synchronization of mobile phone contacts and calendar items with gmail. Google previously released Google Calendar Sync, which synchronizes between Outlook and Google calendar. This allowed you to bounce Google Calendar items off Outlook and onto a mobile phone. Now you can synchronize directly between your phone and Google, AND contacts will be synchronized.
Now our appointments and contacts can be backed up, readily accessible from anywhere, and easily edited from a PC.
You can find instructions here. I had trouble setting up my Windows Mobile phone the solution is here.

Now our appointments and contacts can be backed up, readily accessible from anywhere, and easily edited from a PC.
You can find instructions here. I had trouble setting up my Windows Mobile phone the solution is here.
Saturday, February 14, 2009
Autogenerate Table of Contents in Word
So its that time again and the poor first years are writing briefs in Appellate Advocacy. One of the most frustrating things was creating a table of contents and table of authorities and have all the pages right - especially forgetting to update after an edit.
Auto Generate Table of Authorities
West provides a utility called WestCiteLink that takes the pain out of the table of authorities. There is a Firefox plugin called CiteGenie that is supposed to take the pain out of citation. Bill recommended CiteGenie but I haven't had the time to test it.
Auto Generate Table of Contents
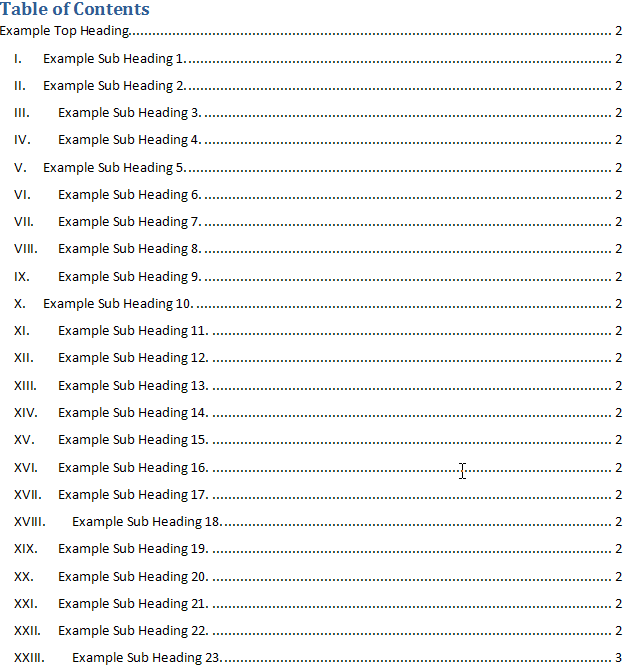
Word has a function that will generate your table of contents automatically. To use it we first have to become familiar with styles. In Word 07, you can find the styles buttons under the Home heading (because the first thing I think of when I think "Home" is styles and fonts etc. - good job M$). In earlier versions of Word, styles can be found under Format->Styles and Formatting (now that makes sense). We are going to be using the heading styles that look like this:
Type some text into a blank word document, highlight the text, and then click on the style you want to apply. As a result, your text looks like the style you selected:

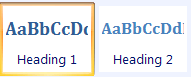
I have created two headings, one with the Heading 1 style, and the other with the Heading 2 style. Word will put all my headings that have been set to a certain style into a table of contents, complete with page numbers.
First click at the place in the document where you want your table of contents. Go to the References tab in Word 07 (go to Insert->Reference->Index and Tables in earlier versions of Word). Then click on Table of Contents:

Then select one of the Automatic tables. Your table of contents is automatically generated.
Customizing Your Styles
Its probably not a good idea to have your brief headings the funky colors, sizes, and fonts that Word defaults to so we will want to customize the heading style.
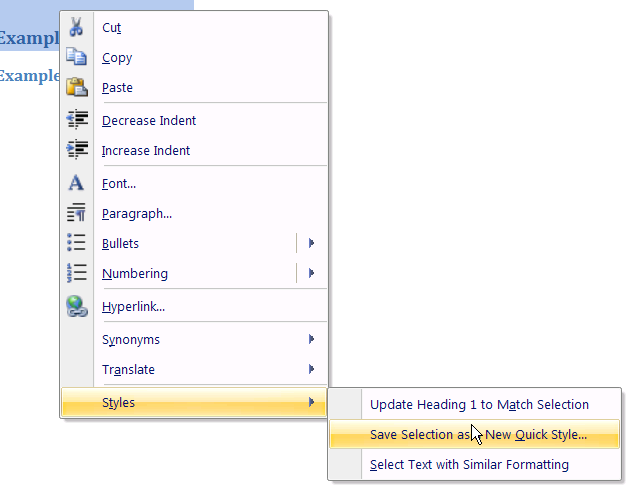
In Word 07, highlight your heading, right click on it, and select Styles->Save Selection as New Quick Style (in earlier versions, right click in the styles menu and select modify):
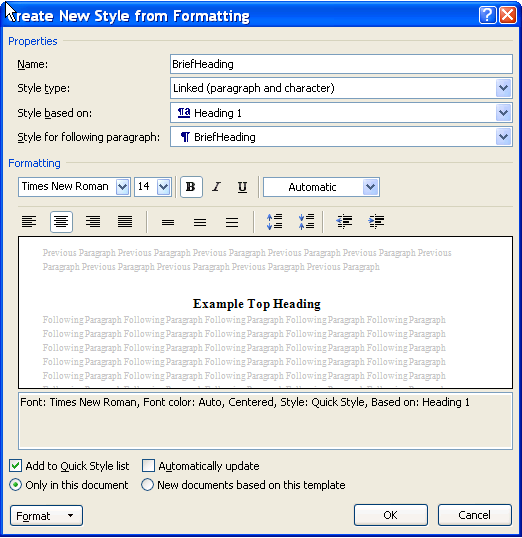
Under name, type a name for your style. Then click Modify. The modify window will pop up and you can set the font, size, and color settings the way you want them.
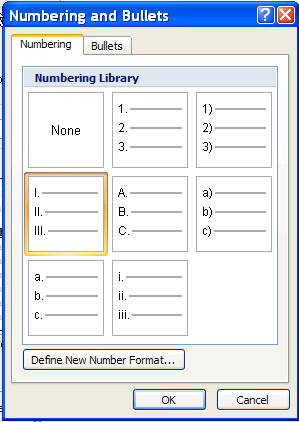
For numbered headings, click the Format button and select Numbering. In the Numbering window, pick the numbering type you want.
When all is finished, you can simply add more headings and then right click on your table of contents and hit update table.
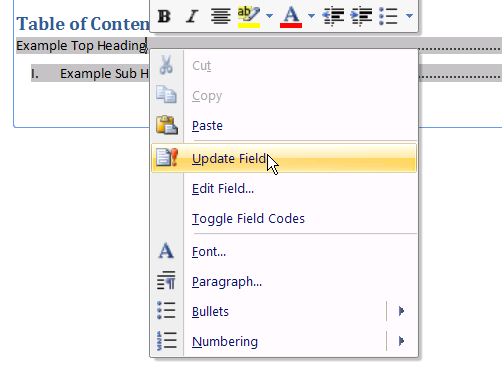
Then select Entire Table (don't just update page numbers). Your table will automatically add the new headings and the right page numbers.
Auto Generate Table of Authorities
West provides a utility called WestCiteLink that takes the pain out of the table of authorities. There is a Firefox plugin called CiteGenie that is supposed to take the pain out of citation. Bill recommended CiteGenie but I haven't had the time to test it.
Auto Generate Table of Contents
Word has a function that will generate your table of contents automatically. To use it we first have to become familiar with styles. In Word 07, you can find the styles buttons under the Home heading (because the first thing I think of when I think "Home" is styles and fonts etc. - good job M$). In earlier versions of Word, styles can be found under Format->Styles and Formatting (now that makes sense). We are going to be using the heading styles that look like this:
Type some text into a blank word document, highlight the text, and then click on the style you want to apply. As a result, your text looks like the style you selected:
I have created two headings, one with the Heading 1 style, and the other with the Heading 2 style. Word will put all my headings that have been set to a certain style into a table of contents, complete with page numbers.
First click at the place in the document where you want your table of contents. Go to the References tab in Word 07 (go to Insert->Reference->Index and Tables in earlier versions of Word). Then click on Table of Contents:
Then select one of the Automatic tables. Your table of contents is automatically generated.
Customizing Your Styles
Its probably not a good idea to have your brief headings the funky colors, sizes, and fonts that Word defaults to so we will want to customize the heading style.
In Word 07, highlight your heading, right click on it, and select Styles->Save Selection as New Quick Style (in earlier versions, right click in the styles menu and select modify):
Under name, type a name for your style. Then click Modify. The modify window will pop up and you can set the font, size, and color settings the way you want them.
For numbered headings, click the Format button and select Numbering. In the Numbering window, pick the numbering type you want.
When all is finished, you can simply add more headings and then right click on your table of contents and hit update table.
Then select Entire Table (don't just update page numbers). Your table will automatically add the new headings and the right page numbers.
Subscribe to:
Posts (Atom)